
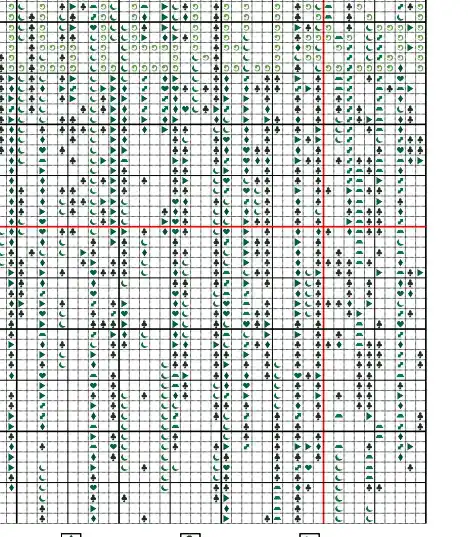
When you start a cross stitch project, the pattern usually includes a chart and, in most cases, a color and symbol key or legend. At first glance these pages can look complicated, especially if you have never stitched from a chart before.
This post explains how to read cross stitch charts and color keys work, what information they provide, and how stitchers commonly keep track of their progress while stitching.
If you haven’t picked a pattern yet, our guide to cross stitch patterns for beginners has some pointers on choosing one.
Inside this post
What a cross stitch chart shows
A cross stitch chart is a grid that represents the finished design.
Each square on the chart equals one stitch on the fabric.
Depending on the pattern, charts may use symbols, colors, or a combination of both to represent the floss color and show where each stitch goes.
Many charts use symbols rather than blocks of color. This makes them easier to read and print, especially for detailed designs or black-and-white patterns. In these cases, the symbols correspond to floss colors listed in the key.
Other charts may use color shading, particularly in digital patterns. Even then, there is usually a key or legend that confirms the exact floss colors to use.
A chart shows you:
- where each stitch goes
- which symbol or color belongs in each position
- how the design fits together overall
Once you understand the layout, the chart becomes a reference as you stitch, rather than something you need to study constantly.
Alphabets are just another kind of chart. Once you can read one, you can add names, dates, or a short quote to almost any design. Our guide to using cross stitch alphabets walks through spacing, centring, and getting lettering to sit neatly.
What the Color Key tells you
This is the section of the pattern you’ll refer to when choosing and preparing your threads.
A typical color key includes:
- Floss color and number
The specific color chosen by the designer, often listed by brand and number, such as DMC 995 Electric Dark Blue. - Chart symbol or color
The symbol or color you’ll see on the chart grid. - Number of strands to use
How many strands of floss to stitch with for that color. - Stitch count
How many stitches of that color appear in the design. - Finished design size
The expected size of the finished piece on different fabric counts, such as 14 count or 16 count Aida.
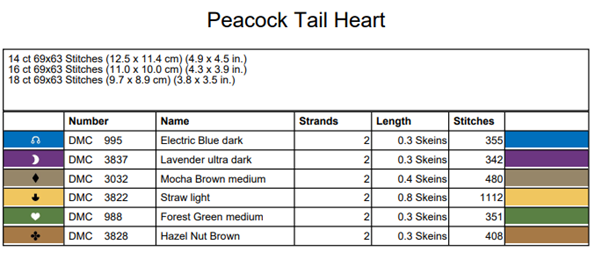
Reading through the key before you start helps you prepare your materials and avoid surprises once stitching is underway.
Reading a simple 10×10 block
Goal: match a symbol on the chart to the key, stitch it, and mark it off.
- Pick a small area to start with (a 10×10 block is ideal).
- Choose one symbol that repeats a few times in that block.
- Find it in the key and note the floss number (and strand count, if listed).
- Count from a clear reference point (center lines, bold 10-grid line, or a stitched area).
- Stitch that symbol wherever it appears in the block.
- Mark it complete (highlight, pencil, or app) before switching to the next symbol.
Tiny tip: If two symbols look similar, double-check the key every time you swap colors — it’s faster than unpicking.
Following the designer’s color choices
For early projects, it’s usually best to follow the designer’s color choices exactly.
Designers select colors so that shades work together and details remain clear at the intended size. Substituting colors before you are comfortable reading charts and keys can make the pattern harder to follow.
Once you have more experience, experimenting with color substitutions becomes much easier and more predictable.
Using the chart when buying floss
Most digital patterns include a separate page showing the color key. This can be printed or saved on your phone and used as a shopping reference.
When buying floss:
- take the key with you – it usually indicates how many skeins of floss you need
- check your existing stash first
- buy only the colors listed for the project
If a listed color is unavailable, choose a close match deliberately rather than guessing later.
Keeping track as you stitch
As you stitch, you’ll need a way to keep track of which parts of the chart you’ve already completed. Stitchers use a range of simple methods, and there is no single correct approach.
Common ways people track progress include:
- Marking the chart as you go
Using a pencil, pen, or highlighter to mark completed stitches, rows, or sections. - Using a working copy of the chart
Print or photocopy an extra copy so the original stays clean, or so the design can be stitched again later. - Using a digital chart or app
Some stitchers prefer marking stitches on a tablet or device instead of on paper.
Any of these ways can help you keep track of where you’re up to, avoid losing your place, or re-counting stitches unnecessarily.
Backstitch: how to read the lines on a chart
Backstitch usually shows as thin lines drawn over the grid. It’s used for outlines, faces, letters, and crisp details.
- Backstitch is usually done after the cross stitches.
- The line often runs between holes, not “inside squares.”
- On many charts, backstitch lines connect grid intersections (the fabric holes), so focus on where the line starts and ends.
If backstitch looks messy at first, that’s normal until the full outline is in place. The clean look comes from the whole set of lines working together.
Half stitches and quarter stitches (fractional stitches)
Some patterns use partial stitches for smoother edges and curves.
- Half stitch: one diagonal (like half of an X).
- Quarter stitch: one diagonal from the center of a square to a corner.
- Three-quarter stitch: a half stitch plus a quarter stitch in the same square.
Patterns usually show these with special symbols or a note. If you’re new, it helps to stitch these slowly and treat them as “detail work” rather than the main stitch.
Common beginner mistakes with charts and keys
These are some of the issues beginners often run into when learning to read charts.
- Mixing up similar symbols
Some symbols look alike at a glance. Double-check the key when changing colors. - Ignoring strand counts
Stitching with the wrong number of strands can change coverage and overall appearance. - Assuming color names are interchangeable
Similar-sounding colors may look very different once stitched. Use the exact color numbers listed when possible. - Forgetting to check finished size
Finished size depends on fabric count. Always confirm that the design will fit your fabric.
Spending a little time with the chart and key before you start saves time and frustration later.
What To Look At Next
Once you’re comfortable reading charts and keys, you might like to:
- Learn more about cross stitch floss for beginners, including types and quality
- Make sure you’re using the right needle for cross stitch to match your thread and fabric
- Set up your fabric properly before stitching
- Or return to the Beginner’s Guide to Cross Stitch to see how materials, tools, and setup fit together


Leave a Reply