Category: Cross Stitch Patterns and Charts

How to choose, read and use cross stitch patterns and charts, from finding a good beginner pattern to spotting a fake and keeping your PDF collection in order.

  • Cross Stitch Patterns for Beginners: How to Choose, Read and Use Them

    Cross Stitch Patterns for Beginners: How to Choose, Read and Use Them

    The pattern you pick shapes your first weeks of cross stitch. A good one gets you hooked. One that’s too much too soon can end up at the back of the cupboard.

    Large patterns can be absolutely stunning, and it’s easy to fall in love with one. But to really set yourself up for success, start with a small pattern, or even a small kit. Finishing it shows you whether you enjoy the craft, and leaves you with something lovely that reminds you that you can do this.

    We’re Kirsty and Sandy, and between us we’ve been stitching for over 40 years. We’ve made plenty of pattern mistakes along the way: designs far too big for our patience, bought charts we couldn’t read, struggled with colour keys with 20 shades of beige.

    Like any new hobby, cross stitch has its own language, and you’ll meet some of it here: counts, keys, confetti, frogging. Learning the words is part of learning the craft, so wherever a new one comes up we’ve linked to our cross stitch terms glossary. Each section is a short overview, with a link to our full post where we’ve written one.

    Don’t let any of it hold you up, though. Stitch your first small piece, see if you like it, and leave learning everything else for later.

    1. What makes a pattern good for beginners

    Your first pattern should be small and achievable, around 50 × 50 stitches. On 14 count (the size of the squares) Aida, that finishes at about 9 cm (3.5 inches). Look for a short colour list and mostly whole cross stitches. Areas of one colour are more relaxing to stitch than single stitches scattered in different colours, which stitchers call confetti.

    For more, including kits versus patterns and common beginner mistakes, see our guide to choosing your first cross stitch project.

    A wall of framed Tiny Little Countries flag map cross stitches

    Small patterns you’ll actually finish

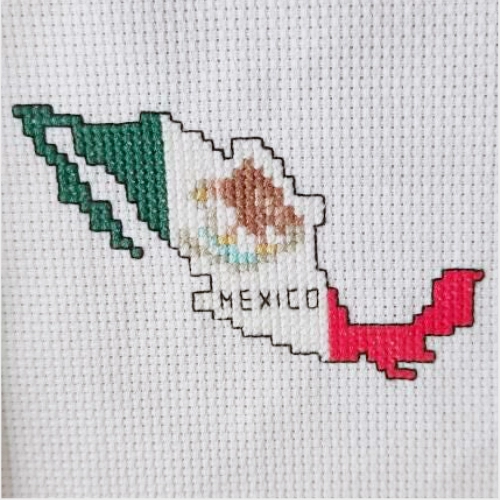
    Our Tiny Little Countries are mini flag map patterns that fit in a small hoop and stitch up quickly. Start with a place that means something to you.

    2. Where to find patterns, and how to spot a fake

    You can buy patterns as kits, in books, or as PDF downloads. PDFs are the cheapest and quickest way to start, and you can print the chart as often as you need.

    Patterns come in two kinds. Counted cross stitch gives you a chart to follow on plain fabric, and that’s what this guide is about. Stamped cross stitch has the design printed straight onto the fabric, so you stitch over the printed colours. Stamped kits can be a gentle way to start, but most patterns you’ll find online are counted.

    The catch is that marketplaces are now full of AI-generated patterns. The listing photo looks beautiful, but the chart is often unstitchable: hundreds of colours, confetti everywhere, and a finish nothing like the picture.
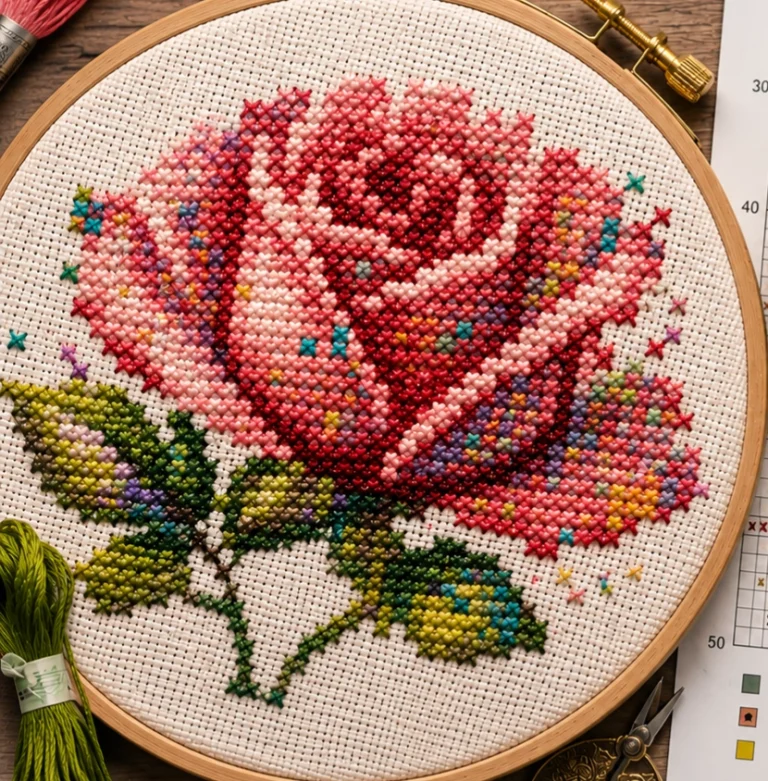
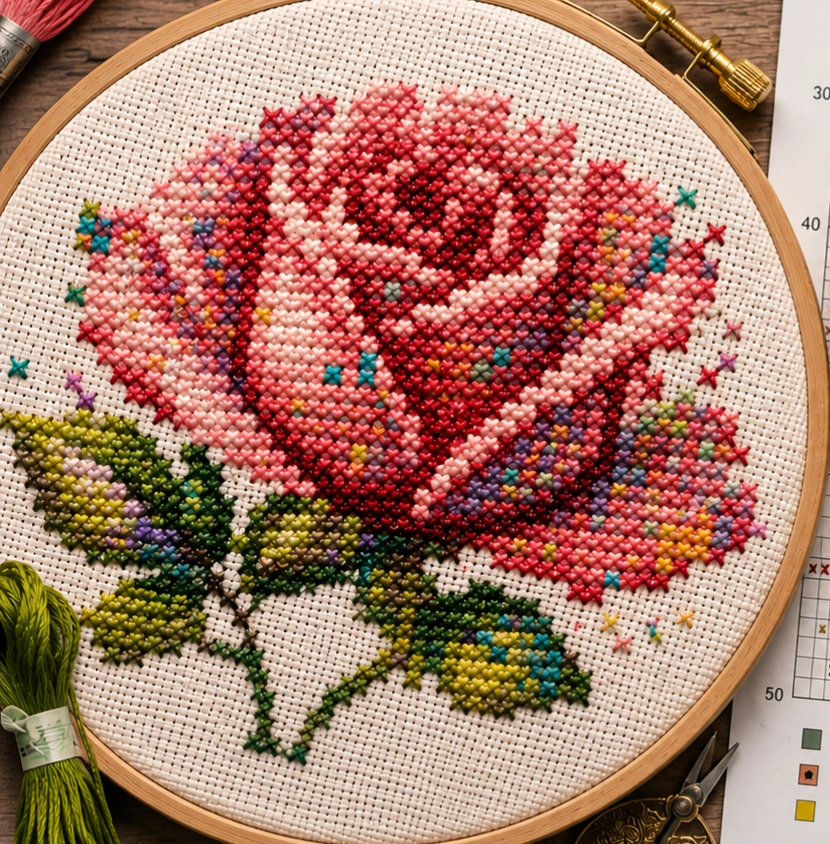
    AI-generated rose cross stitch in a hoop, an example of a fake pattern image
    This rose looks lovely, but zoom in and the stitches don’t look like real cross stitch.

    Quick checks before you buy:

    • Zoom in on the listing photo. Real stitching shows individual crosses and fabric holes. AI images look smooth and painted.
    • Check the colour count. A small design with many colours is a warning sign.
    • Read any lettering in the picture. AI often produces text that looks like words but isn’t.
    • Look for a picture of the chart itself, and for a designer with a real shop history.

    We’ve identified nine warning signs of an AI pattern. You’ll find them all, with examples and a free checklist, in 9 ways to spot a fake cross stitch pattern.

    3. How to read a cross stitch pattern

    A pattern is a grid. Each square is one stitch, and the symbol or colour in it tells you which floss colour to use. Some charts show only black-and-white symbols, while others colour the squares too. Either way, the key tells you which floss each one means.

    Most patterns have:

    1. The chart: a grid, usually with a heavier line every 10 squares to help you count.
    2. The key, or legend: each symbol’s floss brand and colour number, such as DMC 310, how many strands to stitch with, and often how many skeins you need.
    3. Backstitch lines, drawn as solid lines over the grid and usually listed separately in the key.
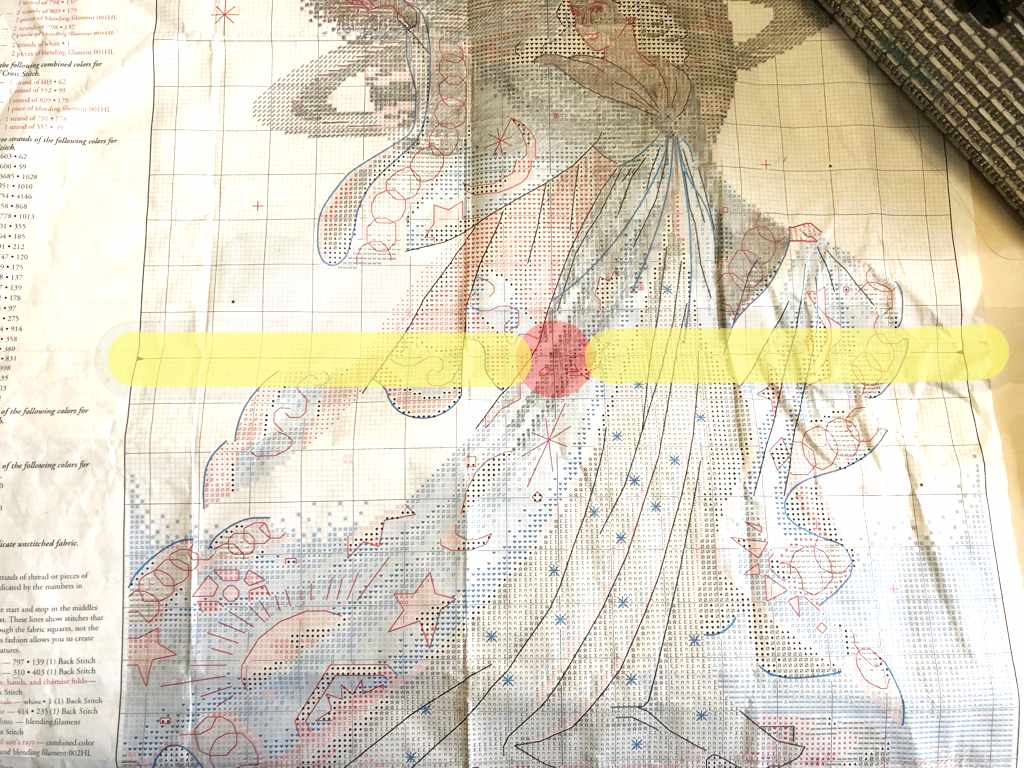
    4. Centre marks: small arrows on the chart edges. Where their lines meet is the middle of the design, where most stitchers start.
    5. The stitch count and finished size, usually on a pattern details page.

    Larger patterns run across several pages, with a small map showing how they fit together. Our post on how to read cross stitch charts and keys covers each part in more detail.

    4. Printing a PDF pattern or stitching from a tablet

    You can print a PDF pattern or stitch from a tablet. Many stitchers do both.

    Paper patterns are low tech and highly portable. Print at 100% so the grid isn’t squashed.

    Many patterns repeat the colour key on every page, and others put it on a separate page. Either way, make sure you have it.

    A tablet saves paper and lets you zoom in. New stitching apps keep reaching the market, but we usually recommend Pattern Keeper because it’s the most mature. It opens many PDF patterns, highlights one symbol at a time and lets you mark off stitches as you go. If you’re considering a pattern to use with Pattern Keeper, check that the designer says it works with the app.

    5. How much fabric you need

    If you’ve bought a kit, there’s nothing to work out. The fabric is included and already cut to the right size.

    If you’re working from a pattern, check the pattern details page. It often lists the finished size of the design for different fabric counts.

    Then add space around the design for finishing. We allow at least 7.5 cm (3 inches) on every side, which leaves room for a hoop, a frame or whatever finish you choose later.

    If your pattern only gives a stitch count, you can work out the size yourself. Divide the number of stitches across by your fabric count to get the width in inches, then do the same for the height. A design 70 stitches across on 14 count Aida is 5 inches (about 13 cm) wide. Our post on how to calculate cross stitch fabric size has the full method, and our free printable Aida ruler tells you your fabric count in seconds.

    6. Keep your pattern and supplies together

    Once you get started, you’ll probably want more stitching time than you have. A proven way to make the most of it is to keep your pattern and everything you need for it together. That doesn’t mean buying the biggest floss box or the fanciest storage.

    If you bought a kit, use the bag it came in and put everything back in there after each session. If you didn’t buy a kit, make your own: a zip-lock bag or a pencil case works just as well. Keep your printed chart and key in with your fabric, floss, needle and scissors. Then you can open it up and start stitching the moment you have some time, without hunting for the key or wondering where you dropped your needle.
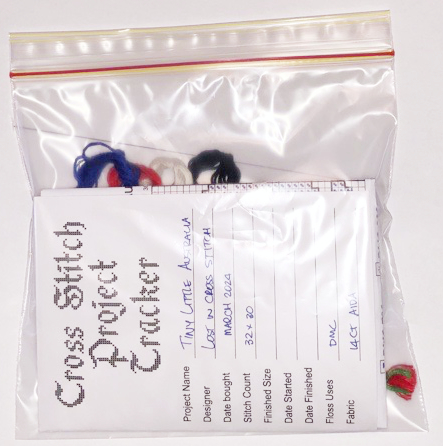
    Cross stitch project kit in a zip bag with floss, fabric and a project tracker card
    A kit can be as easy as a zip-lock bag holding everything for one project.

    Every stitcher has lost part of a project at some point, and a missing chart can stop a project in its tracks. Starting by creating a kit for every project means more of your time goes on stitching. Our posts on choosing a cross stitch project bag and creating a cross stitch project kit have more ideas.

    Cross stitch organizing starter bundle with printable floss drops, WIP tracker and project bag cards

    Keep every project kitted up

    Our Cross Stitch Organizing Bundle has printable floss drops for each project’s colours, bag cards to label every project, and a tracker so you can see them all at a glance.

    7. Keeping track of your pattern

    Mark off stitches as you finish them and you’ll always know where you’re up to. It’s perfectly fine to draw on your pattern with a highlighter, a pencil, even a crayon. Just about every stitcher does. If you’d rather keep the original clean, mark up a copy, and if you bought a PDF you can always print another.

    Two chart habits that save frogging later:

    • Count twice before starting a new area. (Has anyone else noticed that crafts like cross stitch can make you doubt whether you ever learned to count? 😂)
    • Finish one colour in a section before moving on, so you’re not hunting for the same symbol again and again.

    8. Changing a pattern: names, dates and big charts

    A pattern isn’t a rule book. Once you can read a chart, you can add a name or date, swap a colour you don’t love, move a motif, or leave out anything you don’t like.

    To add lettering, plan it on graph paper first using an alphabet chart, so you can check the fit and centre it before you stitch. Our guide to how to use cross stitch alphabets shows how.

    Full-coverage charts (every square stitched) with a hundred or more colours can feel overwhelming. Sara organised her 132-colour piece using Canva, and Sara’s Canva trick for full coverage cross stitch shows how she did it.

    9. Organising the patterns you collect

    PDF patterns take no shelf space, so it’s easy to end up with hundreds scattered across your downloads, email and marketplace accounts.

    Save each pattern into one folder as soon as you buy it, with a name you’ll recognise. Keep a backup off your computer, because shops close and download links expire. Our post on storing and organising cross stitch patterns has a full system.

    10. Ready to start

    With a pattern you love and this guide, you’ve got what you need to get started. New to the craft? Our cross stitch for beginners guide covers fabric, needles and floss.

    Happy stitching.
  • Paint by Numbers Cross Stitch: Should you colour in  your Aida before stitching?

    Paint by Numbers Cross Stitch: Should you colour in your Aida before stitching?

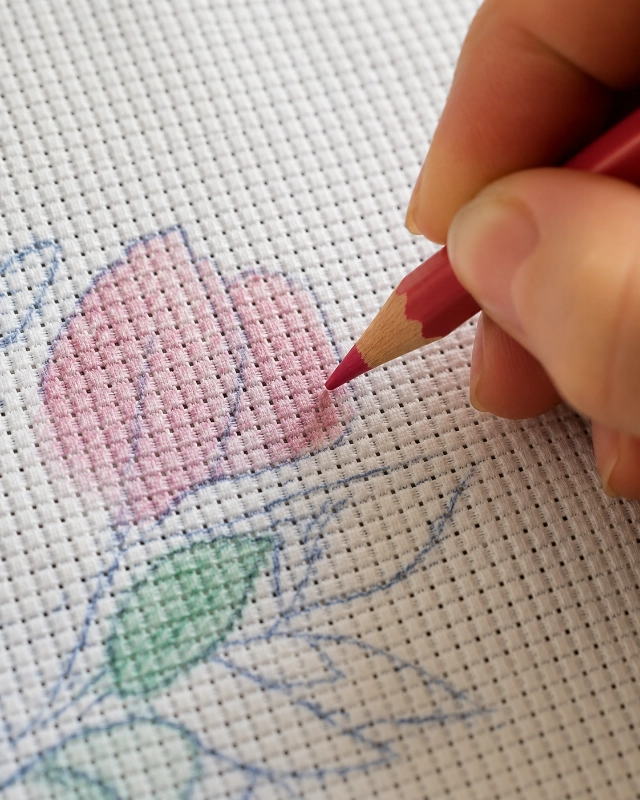
    Short answer: Yes, you can colour your Aida before cross stitching, but we don’t recommend it. We looked at the trend, asked our readers what they thought, researched the risks, and found alternatives that give many of the same benefits.

    This “paint-by-numbers cross stitch” trend has exploded on TikTok, where videos of stitchers colouring every square before stitching have attracted hundreds of thousands of views.

    Fans say it makes charts easier to follow, since every square already shows you which colour lives there, and that it stops white fabric peeking through on full-coverage pieces. Sceptics have thoughts about what pigment might do to fabric and floss.

    We have opinions too. But before we share them, we’re really interested in yours. Take this quick poll (It’s completely anonymous) and after you submit you’ll see what others have said.

    We asked our email community what they thought, and did a roundup a few days later. We think this is a conversation worth continuing, so please add your vote to the poll and your comment to the post (at the bottom of this page).

    cross stitch paint by number colour in your aida

    The Poll Results

    58 readers voted in our poll. Most responses arrived within the first 24 hours, showing there’s plenty of curiosity about the idea. While it’s not a scientific survey, it gives a snapshot of how our community feels about the trend.

    Where the needle landed:

    • Not on my Aida: 48% (28 votes)
    • I’d never heard of it until right now: 33% (19 votes)
    • Haven’t tried it, but I’m tempted: 14% (8 votes)
    • I’ve tried it, with mixed results: 3% (2 votes)
    • I do it, and I love it: 2% (1 vote)

    The poll will stay open (July 2026), so these numbers will grow over time. We’ll come back and update the results as more stitchers share their thoughts.

    So half of our readers want to protect their Aida, a third met the trend for the first time, and only three have actually put pigment to fabric.

    Our Verdict

    The comments told the richer story.

    • An 80-year-old stitcher tried it on small bookmark kits and liked it: “I find it harder to keep my place on a pattern, especially a larger one with lots of color changes… for a small project, it was great.” She also found “some colors on the cloth were harder to determine what color floss to use,” which we’ll come back to.
    • One of you marks with washable and heat-removable pens but hesitates over pencils “for fear of the inks smearing while washing the piece.”
    • Another raised a problem I hadn’t thought about during all my watching: “I might change my mind on a colour and if I’ve coloured it in then I’m stuck.”
    • Several of you had the same verdict about effort: “If you color it in and then cross stitch on top of that, you have done the work twice.”

    Down in the comments below, Joyce agreed (“a lot of extra work and time when I could be stitching”) and Maria put the whole thing in words that deserve framing: “Do not make stitching more complicated; there’s enough trouble in the world already.”

    Your objections sorted into three camps:

    • It doubles the work.
    • It takes the craft out of the craft.
    • And it risks the fabric.

    What struck me is that the third camp was by far the smallest. Almost nobody raised the thing that worries me most, so let me make the case nobody made.

    Cards on the table before I do: I haven’t tested this myself, because I wouldn’t risk a project on it. But the videos kept appearing in my feeds, so I went down the Reddit, TikTok and YouTube rabbit hole on your behalf. Here’s what I found.

    What Is Paint-by-Numbers Cross Stitch?

    A few different things get muddled together whenever this comes up, so let’s separate them.

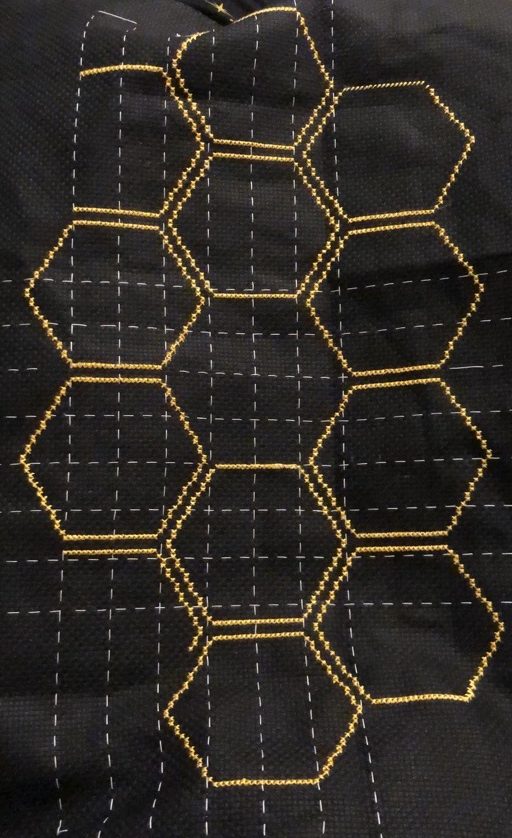
    1. Stitchers have always made marks on fabric. A dot to note the centre, a basted line, gridding to divide the fabric into blocks of ten so it matches your chart. To my mind, those are small and deliberate navigation aids, and they’re not what this Aida colouring-in trend is.
    2. There’s also a long tradition of tinting fabric before stitching, where the colour is part of the finished design. John emailed to remind me that a whole company has been built on this, and he’s right.

      Meg Hawkey’s Crabapple Hill Studio spent decades selling crayon-tinted embroidery patterns: you prime the area with white crayon, tint it with coloured crayons, then heat-set it with a hot iron through paper towels, repeating with fresh towels until no colour transfers at all. Then you stitch. Her crayon tinting tutorial is still on YouTube and worth a watch. The tinting is the visible art, framed by embroidered outlines, and the method exists precisely because pigment on fabric wanders until you’ve deliberately set it. Hold that thought.
    3. The trend is a third thing: colouring in the entire design on your Aida, square by square in the pattern colours, then covering your colouring completely with crosses. The colour isn’t decoration. It’s a counting aid that’s supposed to disappear under the stitching. In effect you’re manufacturing your own stamped cross stitch kit, using pencils and markers.

    Why people love it

    The impulse is completely legitimate, and our 80-year-old commenter is the proof. She finds it harder now to keep her place on a busy chart, she tried the colouring on small bookmark kits, and for a small project it genuinely helped. Easier on tired eyes, fewer counting errors in low light, a gentler on-ramp for beginners, and handy for take-along projects where you’d rather not juggle a chart on a plane.

    Stamped kits have existed for generations for exactly these reasons. Nobody colouring their fabric is being silly. They’re solving a real problem with the tools in the desk drawer.

    The question (dare I say problem) is what those tools do next.

    The Risks of Colouring Your Aida

    Think about what a cross stitch actually is: two passes of floss dragged firmly across the same square of fabric. Now put pigment in that square. Every single stitch hauls your thread over the colour twice, under tension. You know how your floss changes texture as you stitch, gets a bit thinner or fuzzier (depending on the colour). It’s just friction doing what friction does, as we all learned in basic science. I can only imagine that it’s also picking up pigments from the colouring tools.

    Then the pigment that stays behind gets sealed in. Once the crosses are on top, no gentle hand-wash reaches under them, so whatever the pencil or marker left in the fibres is there for the life of the piece. “Water soluble” on the packet means it dissolves in water, and plenty of stitchers have learned the hard way that it doesn’t mean “comes out of fabric on request.”

    Textile conservators will also tell you that inks and dyes not designed for fibre can yellow, shadow, and weaken threads over years, long after the piece is framed.

    So that’s my main issue with this technique. And your comments added two problems I hadn’t thought of:

    • Colouring commits you: change your mind about a colour halfway through, as one of you pointed out, and you’re stuck stitching over your old decision or starting again.
    • And the transfer itself is a chance to go wrong. One reader grids with monofilament and noted that copying a chart onto fabric is exactly where miscounts creep in because we’re only human, and cross stitch often makes us wonder if we can actually count ;).

    And then there’s the colour key problem, which our bookmark stitcher hit head on: “some colors on the cloth were harder to determine what color floss to use.”

    Unless your design is a handful of high-contrast colours, you need a pencil to match every floss shade, or a translation key mapping pencil colours to floss numbers. I don’t own four shades of dusty rose in pencil form, do you?

    At that point you’ve rebuilt the counting problem you were escaping, with extra steps. The viral videos are almost all bold, low-colour folk motifs, which is the best case for this technique, and the videos don’t mention that.

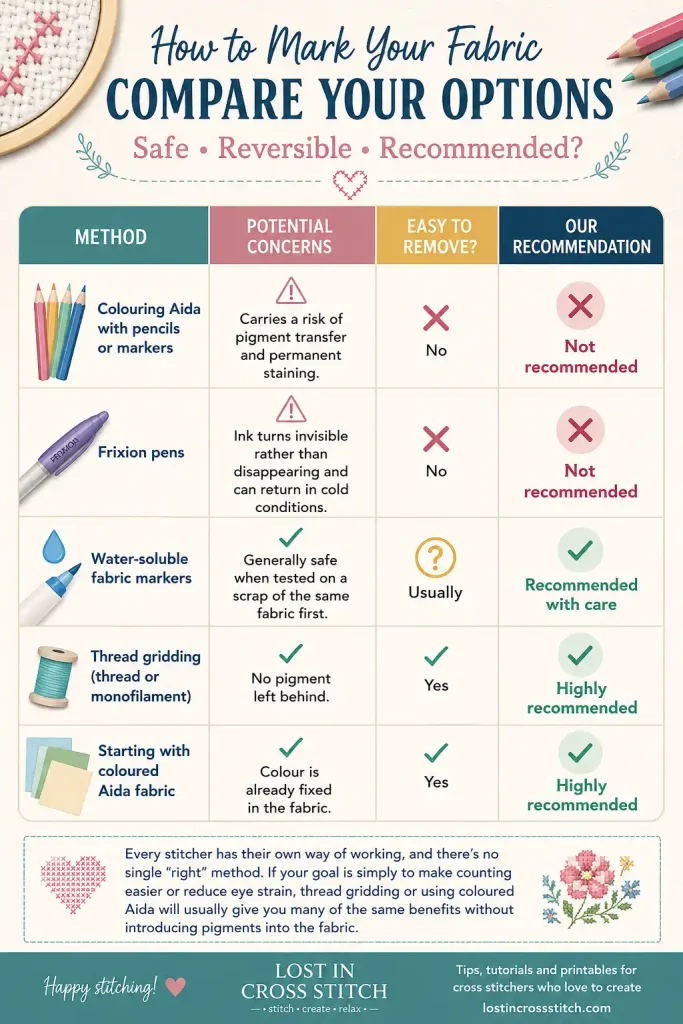
    If you’d rather skip to the practical takeaway, here’s how the different options compare.

    MethodPotential concernsEasy to remove?Our recommendation
    Colouring Aida with pencils or markersCarries a risk of pigment transfer and permanent staining.NoNot recommended
    Frixion pensInk turns invisible rather than disappearing and can return in cold conditions.NoNot recommended
    Water-soluble fabric markersGenerally safe when tested on a scrap of the same fabric first.UsuallyRecommended with care
    Thread gridding (thread or monofilament)No pigment left behind.YesHighly recommended
    Starting with coloured Aida fabricColour is already fixed in the fabric.YesHighly recommended

    Every stitcher has their own way of working, and there’s no single “right” method. If your goal is to make counting easier or reduce eye strain, thread gridding or using coloured Aida can give you many of the same benefits without introducing pigments into the fabric.

    One option deserves its own section…

    Why We Don’t Recommend Frixion Pens

    I’ve used Frixion pens on sewing projects and found the colour difficult to remove completely. When I researched how to fix it, I found that the quilting world has already run this experiment at scale.

    Frixion ink doesn’t disappear when you iron it. It turns invisible.

    The pigment is still in the fabric, and when the weather turns cold, it comes back.

    Quilters have shipped competition quilts by air and had every single marking reappear at the show, courtesy of the cargo hold.

    Some fabrics also keep a permanent ghost mark where the ink was, visible at certain angles forever.

    The Pilot Frixion pen is genuinely lovely. I still use mine when bag making because it gives such great precision, but only when the marks will be inside the seam allowance.

    Pilot has never claimed the pen was designed for fabric, because it wasn’t.

    If a marking tool’s whole party trick is “the marks vanish,” ask where they went. And if they’ll stage a second coming.

    A middle path: the dot method

    If the low-light, keep-your-place benefit is what tempts you, here’s the version I’d actually consider: a small dot of colour at the centre high point of each square, instead of colouring the square in. The centre of the square is where your cross crosses, so the dot ends up buried under the densest part of the stitch, and you’ve put a fraction of the pigment on the fabric.

    Seems to me this would give most of the benefit, much less of the risk.

    I still haven’t tested it, and if I do it’ll be on scrap Aida or a project that I don’t expect to have around for years, which is exactly how I’d suggest you try it too.

    If you want to mark your fabric, use these instead

    For marking that’s meant to disappear, the boring tools are boring because they work:

    • Tailor’s chalk can brush away.
    • A proper water-soluble fabric marker, tested on scrap from the same cloth first, washes out. I have wondered how well that works if you leave it in the fabric for a long time. (Multiple WIPs, anyone?)
    • Thread gridding, with sewing thread or monofilament like our commenter uses, lifts out without leaving anything behind at all.
    Gridding Cross Stitch Fabric

    And if what you’re really after is fabric that isn’t white, that problem was solved long ago: as one of our commenters put it, “choose an alternative colour aida!!” Buy hand-dyed from the dyers who do it beautifully, and the colour is fast before it reaches you.

    If what you love is the colour-mapping

    Here’s where I hand the verdict to three of you who never met and said the same thing:

    • “I color a copy of the chart using colored pencils. I would never on the fabric. My method is a lifesaver for complicated patterns.”
    • Joyce, in the comments: “I could see coloring the printed, enlarged pattern to better see the design.”
    • And a third of you draws on paper and stitches on Aida.

    Colour the plan, not the cloth.

    You get every bit of the paint-by-numbers clarity, your pigment never comes within arm’s reach of your floss, and you can change your mind with an eraser.

    If you don’t want to sacrifice a printed chart, that’s what our cross stitch grid pages are for: print, colour to your heart’s content, stitch from your marked-up copy. There’s also a bound graph paper book on Amazon for those who like a spiral under their hand.

    Your turn again

    The poll was anonymous, but the comments below aren’t, and they’re open. If you’re happy to put your name to your vote, comment where you landed, and if you’ve tried colouring your fabric, how it went. We reply to every comment.

    Frequently asked questions

    Does colouring Aida damage your floss?

    It can. Every cross stitch drags your floss across the coloured square twice, under tension. Floss picks up loose pigment as it goes. Pigment sealed under finished stitches also can’t be washed out later, and inks not designed for fabric may discolour fibres over time.

    Can you colour cross stitch fabric with pencils or markers?

    You can, and one corner of the needlework world does it well: crayon-tinted embroidery, where the colour is heat-set until nothing transfers, then stitched over sparsely as part of the design.

    Colouring entire cross stitch designs with ordinary pencils or markers as a counting aid is a different thing, and it carries real risks of pigment transfer and permanent marks.

    Is it safe to stitch over Frixion pen marks?

    We wouldn’t. Heat-erasable ink turns invisible rather than disappearing, and it returns in cold conditions, which quilters have discovered when marked quilts came back to life after air freight. Some fabrics also keep a permanent ghost mark.

    Use tailor’s chalk, a tested water-soluble fabric marker, or thread gridding instead.

    Does colouring Aida stop white fabric showing through?

    Yes, that’s one reason people try it. However, there are safer alternatives such as choosing coloured Aida or using full-coverage techniques. Or, accepting that the fabric showing through can give your cross stitch that unique airy quality so many of us love.

    paint by number cross stitch aida
    Please share on pinterest
  • 9 Ways to Spot a Fake Cross Stitch Pattern (AI Giveaways)

    9 Ways to Spot a Fake Cross Stitch Pattern (AI Giveaways)

    You’ve probably noticed them by now. Cross stitch patterns that look absolutely stunning in the Facebook group or Etsy listing photo, with stunning shading, glowing colour, the kind of image that makes you click “buy” before you’ve really thought about it and maybe you’re starting to wonder: is this a fake cross stitch pattern?

    There are a lot of them about lately, and they’re gorgeous, which is exactly the problem.

    A good number of these are AI-generated, effectively fake cross stitch patterns, and the thing that makes them so lovely to look at is the same thing that makes them miserable, if not impossible, to stitch.

    This isn’t a post about whether AI is good or bad, that’s a much bigger conversation and not ours to settle here, and it isn’t a “never buy these charts” post either. If you fall in love with one of these designs, and you’re happy with the size and the colours and time commitment, buy it and enjoy it. Plenty of people genuinely love a big, full-coverage piece. The whole point of this post is so you know what you’re buying before you buy it, rather than thinking you’ve picked up a quick weekend make and discovering it’s twenty thousand stitches and half of them are confetti.

    We’ve been stitching and designing for decades, and we have been wondering what impact these patterns will have on our business. This is how we make a living, after all. We’ve been noticing how often people are asking questions in various cross stitch groups.

    And more concerning, we’ve been noticing people posting “this is my new pattern I just finished” and soon a dozen people chime in with “oh wow, gorgeous” comments (people with very ‘thin’ profiles, we’ve noticed). Out of curiosity, we’ve zoomed in and voila, there’s the tells.

    But, we bought a couple to see what we were up against, and we tried a couple of AIs to see what they make. Here’s what we learned, so you can spot one before you’ve handed over your money and your precious stitching time.

    All nine checks are on a free one-page checklist you can save to your phone or print, so they’re with you when you’re browsing. Jump to the checklist.

    What an AI-Generated Cross Stitch Pattern Actually Is

    An AI image tool can spit out something that looks like a finished cross stitch piece in seconds. Software then converts that image into a chart, and it gets listed for sale. It looks like a chart. It’s sold like a chart. But a beautiful AI-generated cross stitch picture does not, ever, translate well into something you can stitch, because no one who actually stitches placed every stitch.

    The thing AI is brilliant at is smooth, photographic shading, those gradients that melt one colour into the next. On a screen it looks incredible.

    But cross stitch doesn’t work in smooth gradients. It works in stitches of single colours (with one exception we’ll discuss below). So when that gorgeous gradient gets converted into stitches, the only way the software can fake the smoothness is to scatter hundreds of single stitches, one of this shade, one of that, with no blocks to follow. It looks beautiful zoomed out. Up close, it’s confetti.

    Almost everything else that makes these patterns slow and probably messy to stitch comes back to that one fact.

    If you know what you’re buying before you buy it, you know that you’ve not picked up a quick weekend make.

    How to Spot a Fake Cross Stitch Pattern Before You Buy

    1. Zoom right into the shading

    Zoom into any shaded or curved area of the listing photo.

    AI-generated rose cross stitch in a hoop, an example of a fake pattern image
    At first glance it looks real.

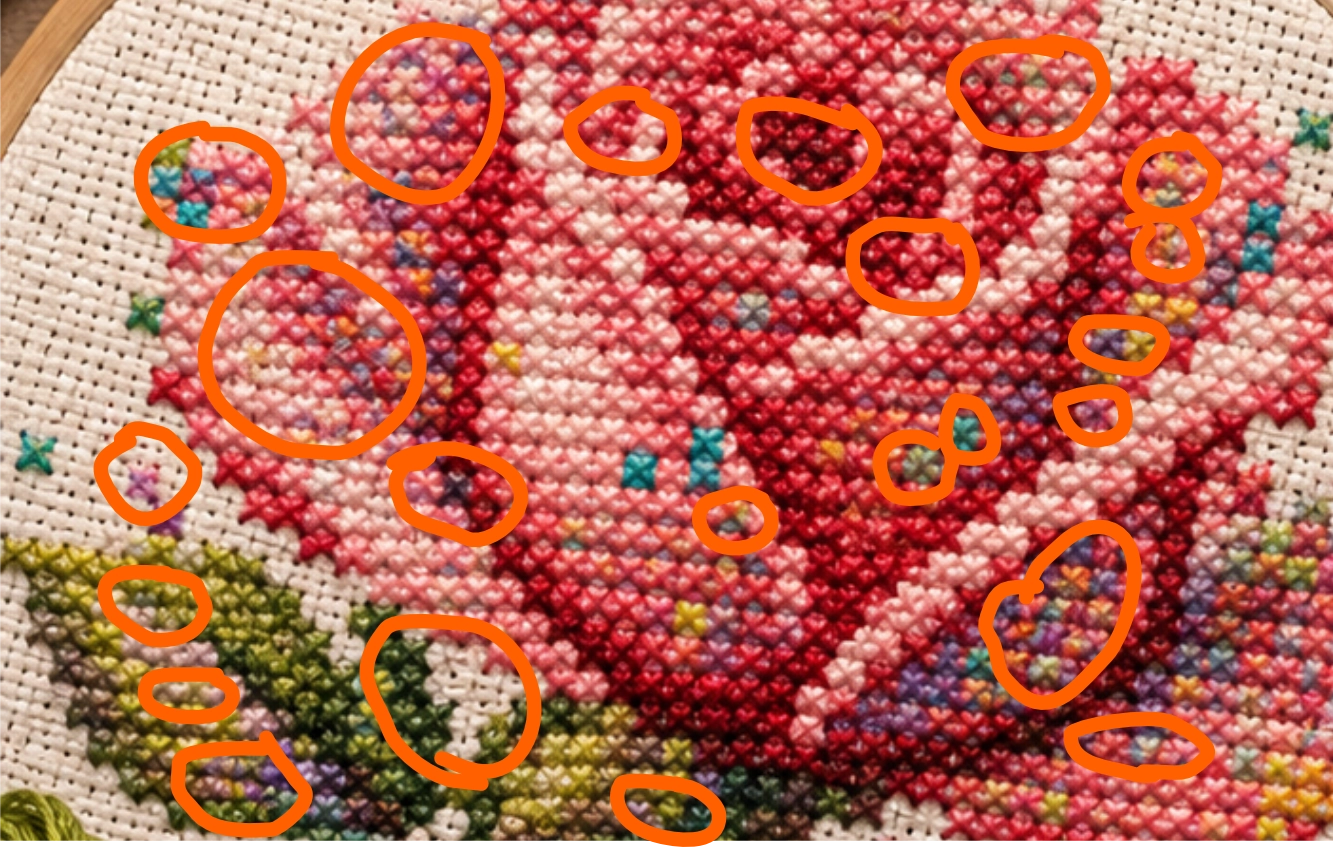
    Real cross stitch colours step into each other over a few rows or columns. If the shading you’re seeing has more than one colour in a single stitch, it’s very likely you’re looking at an AI-generated cross stitch pattern. You’ll also see truly weird filler stitches – not 1/2 or 1/4 stitches, rather some odd mix. We could have circled hundreds more stitches in this image.

    Even the fabric looks strange.

    can you spot the fake cross stitch pattern.
    Just some of the odd blending and stitch forms in this image. It looks real but when you zoom in….

    2. Check the colour count

    Faking those smooth gradients takes a lot of shades. If a fairly simple subject calls for dozens, or well over a hundred colours, ask yourself why. A hand-designed chart uses the colours it needs and no more. A converted AI image often needs an enormous palette just to hold the illusion together.

    And, all those shades end up scattered across the design as single stitches, one of this colour, one of that, with no blocks to work from. Stitchers call this confetti, and a whole pattern made of it is slow, fiddly work, constantly switching thread for a single stitch at a time.

    Confetti isn’t bad on its own, it can add a real sparkle to a piece. But human designers manage it so it adds the sparkle, not the madness, to the stitcher.

    3. Look for full coverage

    Lots of AI-generated cross stitch patterns stitch every single square, including backgrounds that could happily be left as bare fabric. Full coverage is sometimes a real design choice that stitchers love, such as the much-loved Heaven and Earth designs, and even some of our own landscapes.

    Some AI pattern sellers do remove the background, so this one’s a clue rather than proof. But a piece that fills every square, especially in areas that didn’t need it, is often carrying that gradient logic right across the whole design.

    4. Check the size and the stitch time

    A well-considered pattern listing tells you the stitch count and the finished size, usually across a few fabric counts. We’ve put those on our listings for years, because they’re useful to a buyer.

    Two things to watch: if a simple-looking piece runs to tens of thousands of stitches, that’s the gradient tax and you’re signing up for a very long stitch, which is great if that’s what you want.

    And if the listing is vague about the numbers altogether, it might be because they’re alarming once you see them written down.

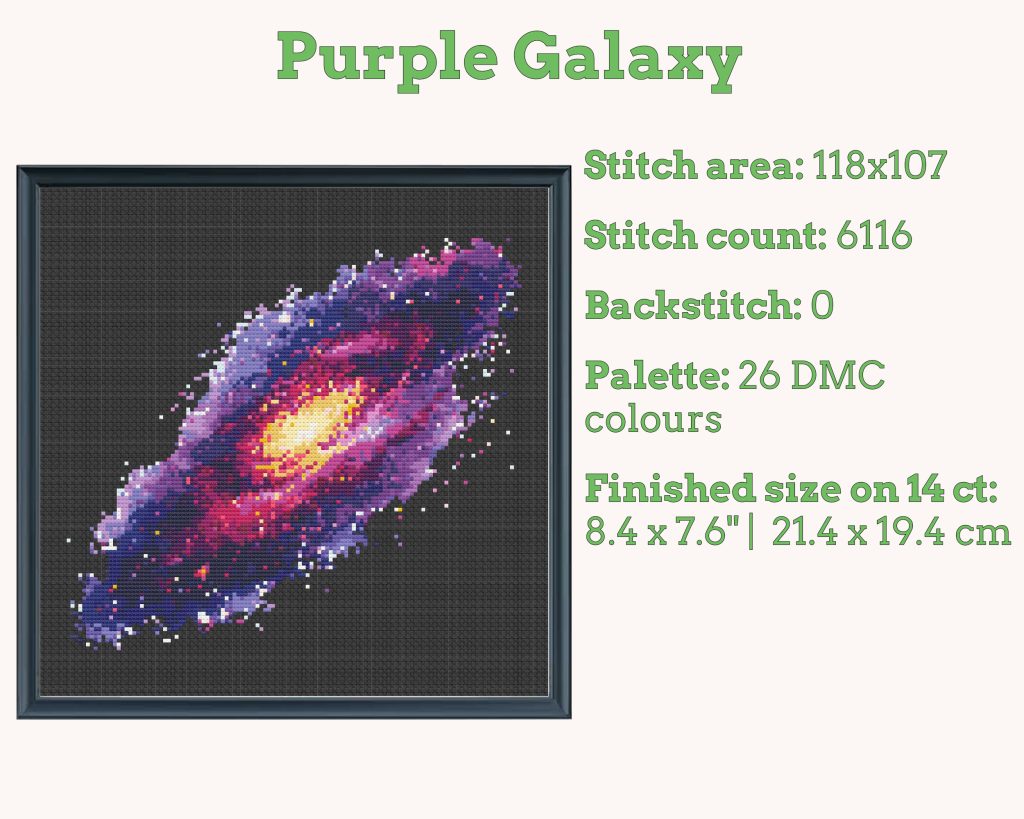
    Look for listing images or descriptions that give you the pattern’s stats.

    Purple Galaxy cross stitch pattern listing with stitch count, size and DMC colours
    This is a listing image of one of our spacey patterns – in recent years we’ve added stats so you know what you’re committing to. Also an example of purposeful confetti to add extra gradient and sparkle for the spacey-feel.

    5. Look at the backstitch

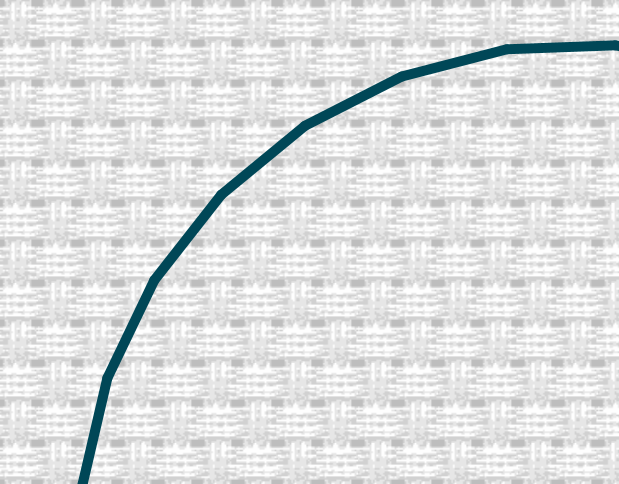
    Backstitch on real fabric travels along the grid, so it’s made of short segments that step around the squares, usually with a few angles to it. You can stitch one over two or one over three to smooth a line out, but long, smooth, sweeping backstitch curves aren’t really stitchable. If the outlining flows like a pen drawing and ignores the grid entirely, that’s a drawn line, not a stitched one.

    A good quick test: look for a backstitched circle in the design. You can’t stitch a truly round circle in backstitch, it will always have little flat steps where it follows the grid. A smooth, perfectly round circle is a giveaway that an AI designed it.

    a fake cross stitch pattern will show very smooth curves for backstitch.
    A backstitch circle will always have at least small points, as the stitches follow the spaces in the fabric

    6. Look for things that make no sense

    This one is about the picture itself, not the stitching. AI is notoriously bad at small details, so look for an extra finger or two, a cat with an odd number of paws, a paw or ear that melts into the background, a face that isn’t quite right.

    And if there’s any lettering, read it. AI often produces text that looks like real words at first but when you actually try to read it, it’s alien gibberish. A wonky hand or a nonsense word can tell you immediately. Most cross stitch text will have at least some backstitch. AI text will be in cross stitch, with speckled shading around it.

    Of course, this might improve over time so depending when you’re reading this, it might no longer apply. But at time of writing (2026) we’re 3 years into the AI Revolution and it definitely still applies.

    7. Read the reviews closely

    Look for actual verified shop reviews, not “ooh lovely” comments under a photo in a Facebook group.

    And be fair about it: only around one in ten buyers ever goes back to leave a review, so a newer or smaller listing won’t have many, and that on its own means nothing.

    What you’re after is whether the people who stitch the patterns in this shop thought they were stitchable and gave a result that was close to the listing images. If they enjoyed it, and were delighted enough to post a pic of their own finish, even better.

    Only a tiny fraction of people who leave reviews, add photos. So you won’t see them on every review.

    8. Look at the size and freshness of the whole shop

    One person can only hand-design so many patterns. A young shop with hundreds of wildly different, highly detailed designs, all appearing in a short space of time, is worth a second look, because that’s more than two hands can physically do.

    The exception is a shop with a team of designers, or an established craft retailer carrying many named designers, which is perfectly fine.

    But if a shop is a year old with 1000 patterns, take a few minutes to look much closer.

    9. Check whether the symbols are distinct

    If the listing shows you a chart preview of that pattern, look at the symbols. On a well-made chart they’re carefully chosen to be easy to tell apart. Of course they can’t show you the whole chart because if they give away the chart, they don’t have a business. But a chart with a huge colour palette can be a mass of similar-looking symbols, which can make your eyes bug out, even when everything else is fine.

    One thing that’s not a red flag

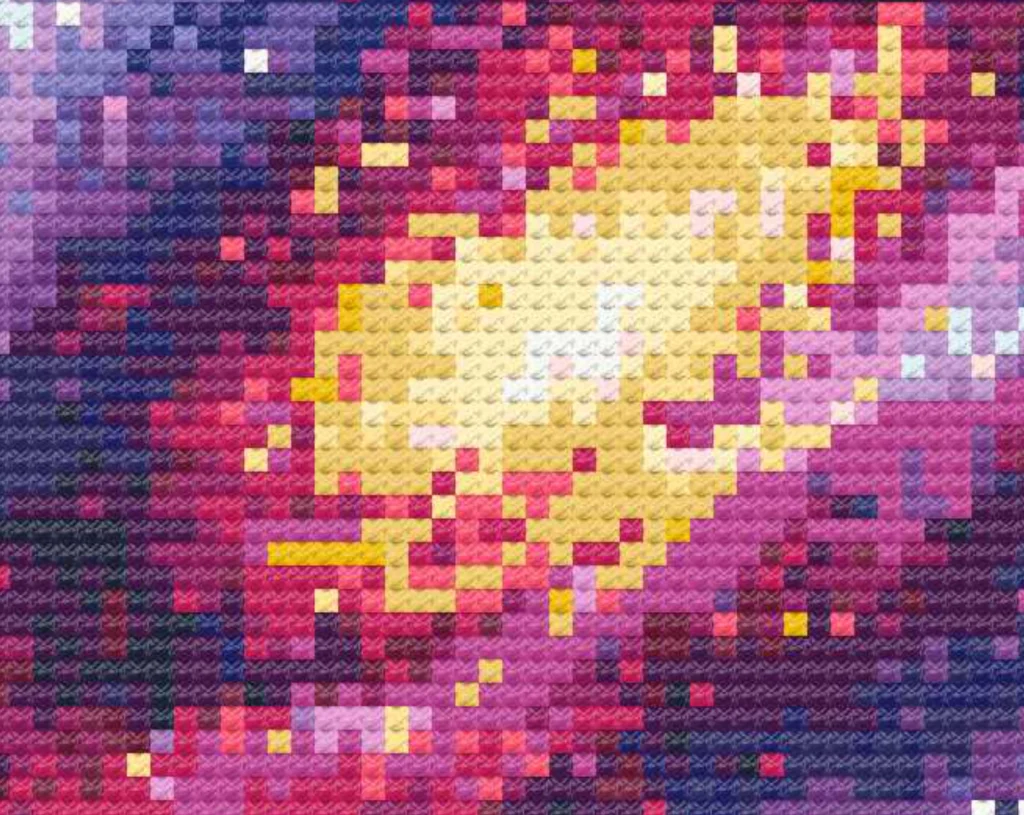
    A software-generated preview image is not the same as an AI-generated pattern.

    Almost every designer uses charting software, including the big names like DMC. Software makes a neat representation of the finished piece, and yes, if you zoom into one of those you’ll see computer-rendered stitches. That’s completely normal. It’s not the enemy.

    Gold Nebula cross stitch, a pink and gold galaxy shown as stitched
    Zoomed in view of the computer-rendered version of our Purple Nebula cross stitch pattern

    The difference is the colour of the stitches. With a real chart, a person has placed every single stitch by hand, chosen the palette, kept the confetti under control, checked the grid, and the software is rendering that human work as single-colour stitches.

    So a software preview of a real, hand-charted design is not a fake cross stitch pattern. A converted AI image sold as a chart is.

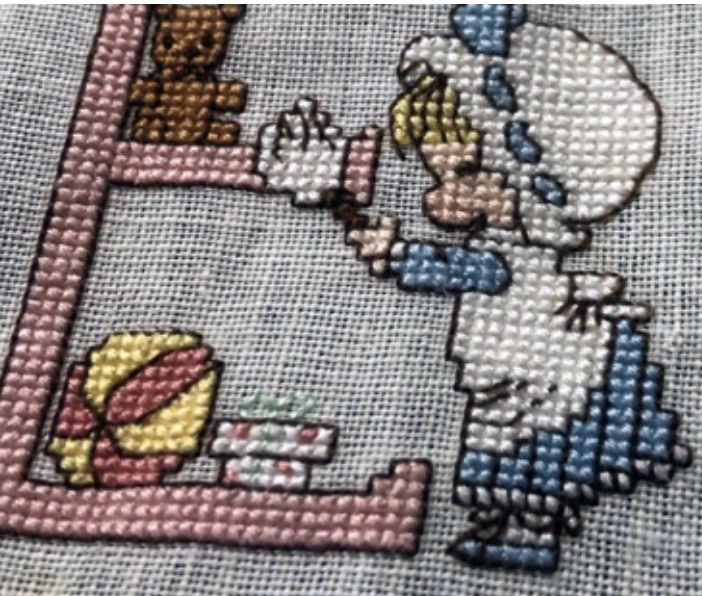
    Close-up of real cross stitches on linen
    And here’s real hand stitching.

    The exception we mentioned at the beginning

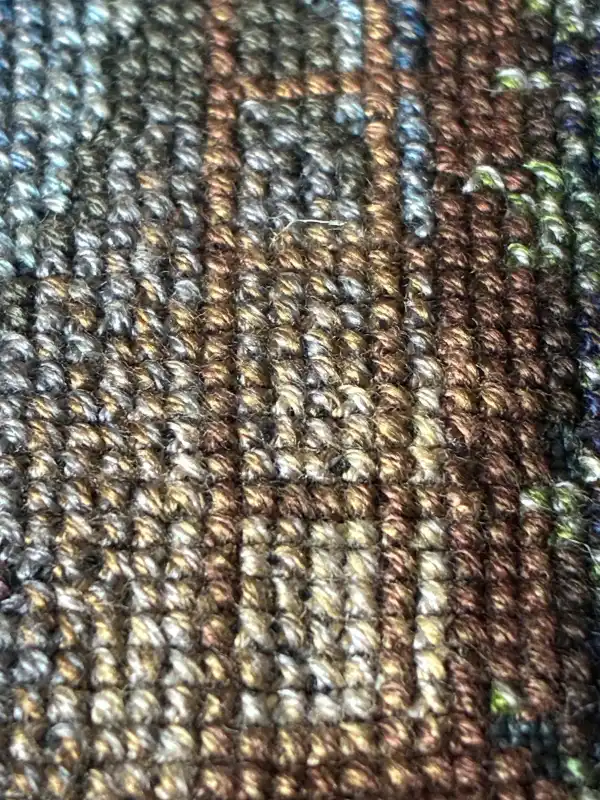
    The exception is with what’s called tweeding. This is where a strand of two different colours are stitched together. But then you’ll be able to see the two different colours, laying side by side, on each stitch. An AI-generated image will have a stitch where, in a single stitch, two or more colours kind of wash over the stitch.

    example of tweeding in cross stictch
    Multiple tweeded colours in this example – the greys and browns in particular. Also – real hand stitching – the stitches are not quite perfect.

    A word about our own patterns, since it’d be fair to ask. We place every pixel by hand. We stitch many of our patterns ourselves, though not all of them, because there’s only two of us and we’re running a business that takes a lot of hours.

    A chart being real has never been about whether it was physically stitched. It’s about whether a human who is a cross stitcher designed it, stitch by considered stitch.

    The Shortcut: Buy Cross Stitch Patterns You Can Trust

    We get it, no one wants to run a forensic investigation on every $4 pattern when all you want is to pick something pretty and get on with your next stitch. We’re not suggesting you squint at every listing for the rest of your life, or stop buying patterns online because it’s too hard to trust your own eyes.

    What we are suggesting is learn what a well-made chart looks like once, get a feel for it, and then you can stop checking everything and just buy from designers you’ve come to trust. Find a few makers whose charts you know are sound, and the squinting stops. Knowing the tells means you’ll know good work when you see it, so you can get back to enjoying the part you actually came for.

    Our guide to cross stitch patterns for beginners includes a few quick checks to run before you buy.

    As we said earlier, these tools are getting better all the time, so some of the tells in our checklist won’t hold forever. The gradients and the weird stitches and the impossible backstitch give things away today, but a year or two from now the giveaways might be different. They might even do away altogether! But this is where things stand right now, and we’ll update it as things change.

    If you’d like a place to start, everything in our shop is charted by hand, by the two of us, stitch by stitch. We keep the confetti under control and choose every palette on purpose, and we’d love for you to come and have a look.

    Starry Planet landscape cross stitch pattern in a frame

    Patterns charted by hand, stitch by stitch

    Every pattern in our shop is charted by the two of us, with every colour chosen on purpose and no confetti for the sake of it. Our landscapes are a good place to start, from desert lookouts to starry skies.

    Use code REALPATTERN at checkout for 10% off your order.

    Your free checklist

    We’ve put all nine checks onto a single page you can save or print, so the next time a too-good-to-be-true pattern catches your eye, you’ve got the list to hand. No sign-up, no catch, just download it and keep it with your stitching.

    Download the checklist.

    Before you buy floss for your next pattern, check what you already have. Our DMC floss mini book is a pocket-sized inventory of every DMC colour: tick off what’s in your stash, tuck it in your project bag, and stop buying the same skein twice.

    We’d love you to leave a comment to let us know your thoughts on this issue, and the checklist.

    Happy stitching, and may all your patterns stitch out exactly as you expect.

  • Storing and organizing cross stitch patterns

    Storing and organizing cross stitch patterns

    If you’ve ever spent 20 minutes searching for a pattern you know you bought, only to give up and buy something else instead (I may resemble that remark 😜) and that’s when a system for storing and organizing cross stitch patterns can make a real difference.

    We cross stitchers know that we probably have three separate hobbies:

    • collecting patterns
    • collecting supplies
    • actually stitching.

    (Not just me, is it?) If your pattern collection has grown faster than your stitching time, a system for storing PDF patterns can make your collecting life a little easier.

    Quick start checklist

    • Create one folder for all your cross stitch patterns
    • Add subfolders only if you’ll actually use them
    • Download new purchases immediately (don’t leave them in email)
    • Rename unclear filenames so you can find things later
    • Use a binder with plastic sleeves for printed patterns
    • Back up your folder somewhere safe
    • Consider tracking your collection so you know what you own

    One folder, one habit, and you’ll always know where your patterns are.

    The real problem with PDF pattern storage

    We usually don’t need to find shelf or craft room space for digital patterns, which makes it very easy to collect hundreds of them. But unlike a stack of paper charts you can flip through, PDFs become invisible the moment you download them.

    Out of sight, out of mind, and eventually out of memory entirely.

    The other issue? Etsy shops close. Websites disappear. That pattern you bought three years ago might not be available for re-download if the designer has retired. And if you’re relying on being able to re-download from your purchase history… that only works if the shop’s still there.

    Having a system for cross stitch pattern organization means you can actually find and use what you’ve paid for, years from now if needed.

    A simple system for organizing cross stitch patterns

    You don’t need special software or a complicated setup to keep track of your digital cross stitch patterns. For me, just one folder and one habit made a huge difference.

    Step 1: Create a dedicated folder

    Make a folder called “Cross Stitch Patterns” (or whatever makes sense to you) somewhere you’ll remember. Your Documents folder works fine. So does a cloud drive like Google Drive or Dropbox if you stitch from multiple devices.

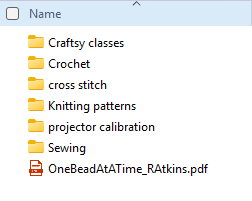
    folder list to help with organizing cross stitch patterns
    My Patterns folder and sub-folder structure

    Inside that main folder, you can add subfolders if you want them. Some options that might work for you:

    • By designer name
    • By theme (Christmas, florals, samplers)
    • By status (To Stitch, In Progress, Finished)
    • By project type (SALs, quick stitch, large projects)

    Set up the structure that suits your brain or way of working.

    Or, don’t bother with subfolders at all. A single folder with everything in it is still much better than file links in a couple of email accounts or files scattered between your desktop and downloads folder.

    Keep it lightweight enough that you’ll actually use it.

    Step 2: Download immediately

    This is the practice that makes everything else work.

    When you buy a pattern, download it right away and move it to your folder. Don’t leave it sitting in your email or your Etsy purchases thinking you’ll deal with it later.

    It really only takes a minute or two and then it’s done. because for me anyway, later never comes. Then the designer retires and you’ve lost it forever.

    Step 3: Rename if needed

    Some designers use helpful filenames like “Cottage_Garden_Sampler_SAL #1.pdf” and some use things like “FLO2847_v3.pdf” which tells you … very little.

    Take ten seconds to rename the file to something you’ll recognize. Your future self will thank you.

    What about printed patterns?

    If you prefer to print your PDFs for stitching (and many of us do), you’ll want a system for the paper copies too. A binder with plastic sleeves works well. You can organize by designer, theme, or project status, and it’s easy to pull out what you need and slip it back when you’re done.

    Our guide to cross stitch patterns for beginners has a section on printing PDFs or stitching from a tablet.

    For SALs or multi-part patterns, keeping all the pages together in one sleeve along with any notes or project cards means everything stays in one place. If you’re stitching on the go, a project bag can keep your current printed pattern with your supplies.

    cross stitch pattern organisatio folder
    Pattern folder for the James Webb Telescope SAL I did in 2025

    Tracking the cross stitch PDFs you own

    A folder system tells you where your patterns are, but it doesn’t give you a quick overview of everything you’ve collected. If you want to see your full library at a glance, a simple tracking page helps.

    Our Cross Stitch Planner includes a Pattern Library page where you can log each pattern with the designer name, whether it’s digital or physical, the difficulty level, and when you bought it. It’s a quick way to see what you have, avoid buying duplicates, and maybe even remember that gorgeous pattern you bought two years ago and completely forgot about.

    Organizing cross stitch patterns is easier with a planner
    Stash management pages from our printable cross stitch planner (available in 5 styles)

    A note on backups

    If your patterns live on your computer and nowhere else, they’re one hard drive failure away from disappearing. Consider keeping a copy on a cloud service, an external drive, or both. Takes five minutes to set up and you’ll be glad you did.


    Frequently Asked Questions

    What’s the best way to organize digital cross stitch patterns?

    Create a dedicated folder on your computer or cloud drive, download patterns as soon as you buy them, and rename files so you can find them later. Subfolders by designer, theme, or status are optional but helpful if your collection is large.

    How do I keep track of all the patterns I own?

    A tracking sheet, spreadsheet or pattern library page lets you log each pattern with details like designer name, format, and date acquired. This helps you avoid buying duplicates and remember what’s in your collection.

    Can I re-download patterns I’ve bought?

    Usually yes, but only if the shop or designer is still active. If they’ve closed or retired the design, you may lose access. Download and save your patterns as soon as you buy them.

  • How to Use Cross Stitch Alphabets

    How to Use Cross Stitch Alphabets

    If you’re learning how to use cross stitch alphabets, the part that usually takes the most time isn’t the stitching, it’s getting the layout and spacing to look right.

    This post shows a quick paper-first method, so you can test your wording in pencil and know it will fit before you stitch. There’s also some examples of our cross stitch alphabets to help show ideas.

    Use cross-stitch alphabets for names, dates, and quotes

    Cross-stitch alphabets are great for:

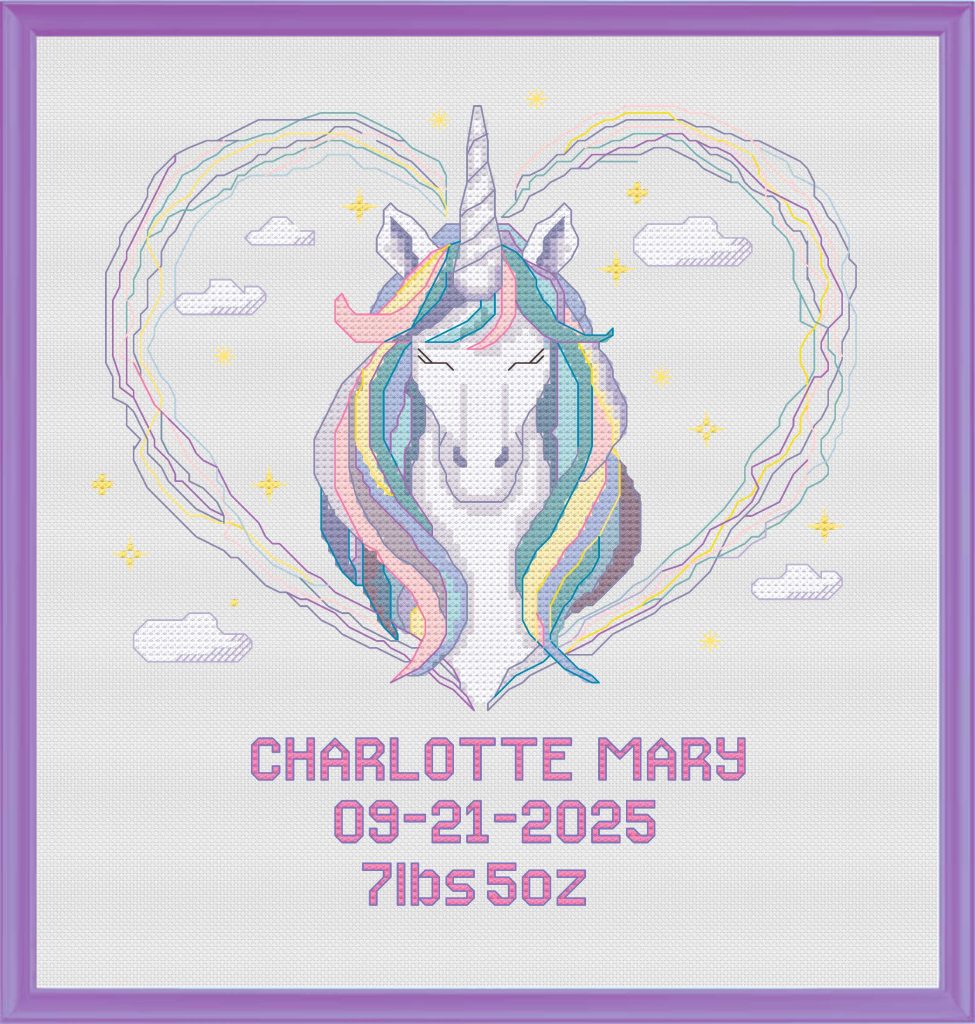
    • Names on baby announcements
    • Dates under a motif
    • Labels for project bags and stitched gifts
    • Sampler titles and short quotes
    • Ornament tags and keepsakes

    If you can picture where you want the words to go, an alphabet chart lets you add them without changing the rest of your design.

    They’re also handy for “signing” a finished piece with initials and a year, using a tiny backstitch alphabet.

    Really, you can use a cross stitch alphabet anywhere you want to personalize a project.

    Our guide to cross stitch patterns for beginners has a few more ideas for changing a pattern.

    What you need

    You don’t need anything fancy, just a way to test your layout before you commit to stitches.

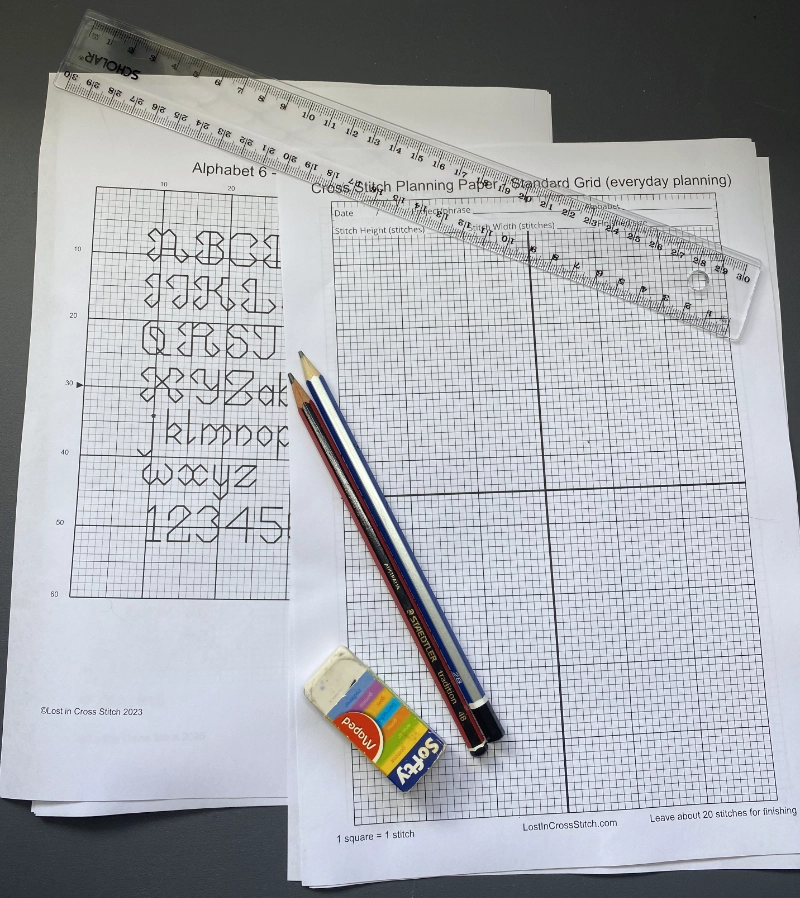
    everything you need to be able to use cross stitch alphabets efficiently
    • Cross stitch planning paper (grid pages)
    • Pencil and eraser
    • Your alphabet chart
    • Ruler (optional)

    Sketch lightly first so you can erase and adjust until it looks exactly how you want it.

    Printables for the paper-first step (optional)

    Step-by-step

    1. Count the available stitches on your fabric. This is critical!
    2. Write your word or phrase exactly as you want it stitched (caps, punctuation, numbers).
    3. Draw a text box on planning paper the same stitch width you have available.
    4. Mark the centre of your available space. Use the center marks on our planning paper if you’re using it.
    5. Copy each letter from your alphabet chart into the box, in pencil, square by square.
    6. Add spacing as you go. Start with 1 square between letters.
    7. Step back and check the look.
    8. Erase and adjust until it feels balanced.
    9. Darken the final version so it’s easy to follow while you stitch.
    10. Stitch from your paper plan.

    Once you’ve drafted the word on paper, the rest is just placing it on fabric and stitching it.

    Choose the right alphabet style

    Different alphabet charts stitch up very differently, so it helps to pick a style that matches your project.

    Backstitch alphabets

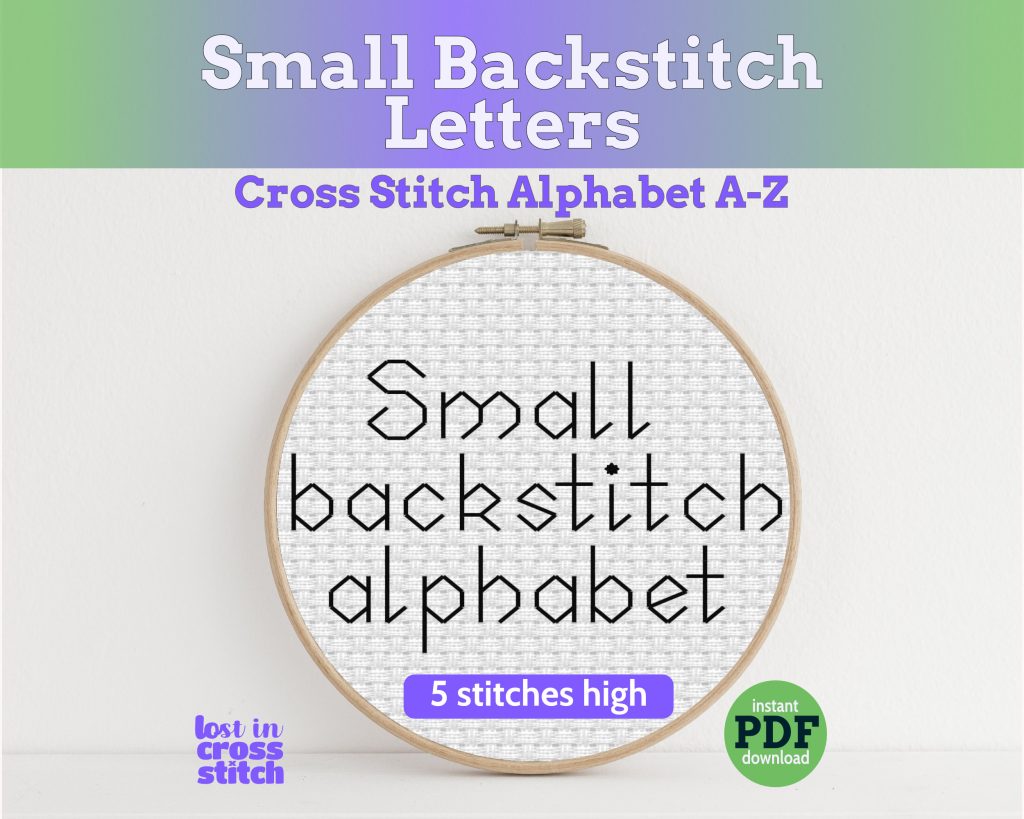
    Backstitch alphabets are “drawn” with thread, so they stay clean even when the text is small. They’re great for tiny names, labels, ornaments, ‘signing’ your work, or adding text to busy designs. They’re tidy, easy to read, and in many sizes including some that don’t take up much room.

    Small Backstitch Letters A to Z cross stitch alphabet pattern in a hoop

    Small backstitch alphabet

    Full cross stitch alphabets

    These letters are built from solid blocks of crosses. Use them for big names, headings, sampler titles. They’re thicker letters, more “pixel” style because they’re made from complete cross stitches.

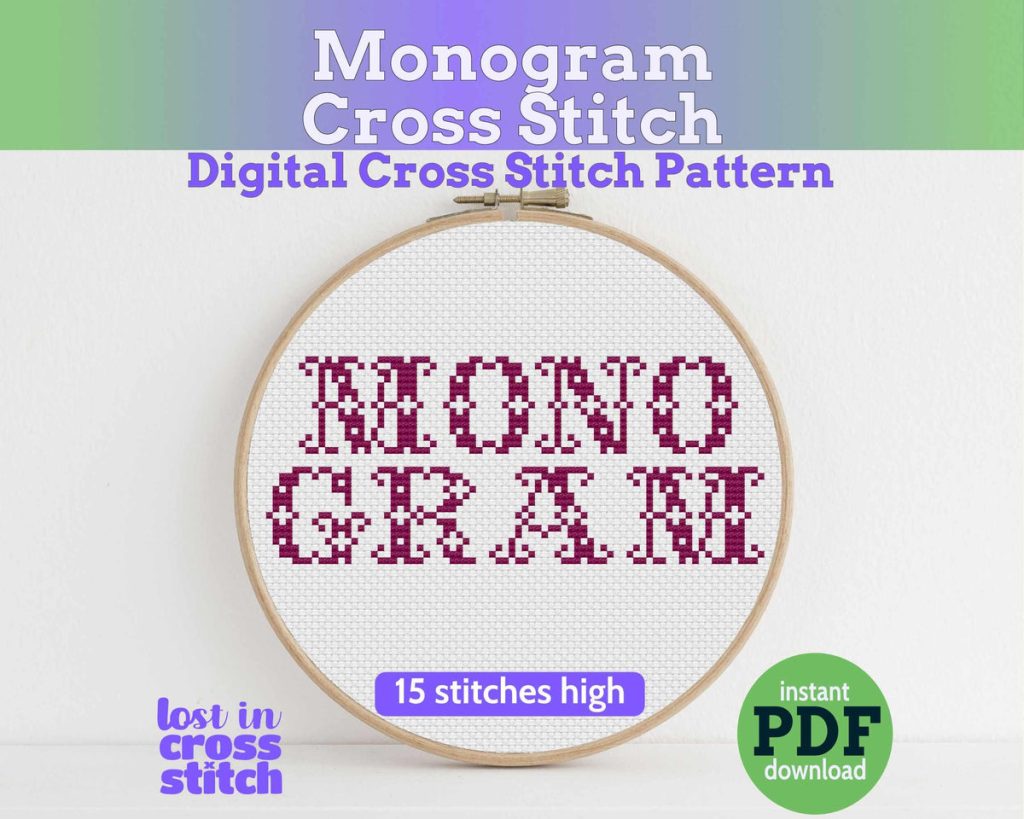
    use a cross stitch alphabet like this fancy capitals one to

    Our Fancy Upper Case alphabet pattern

    Partial stitch alphabets

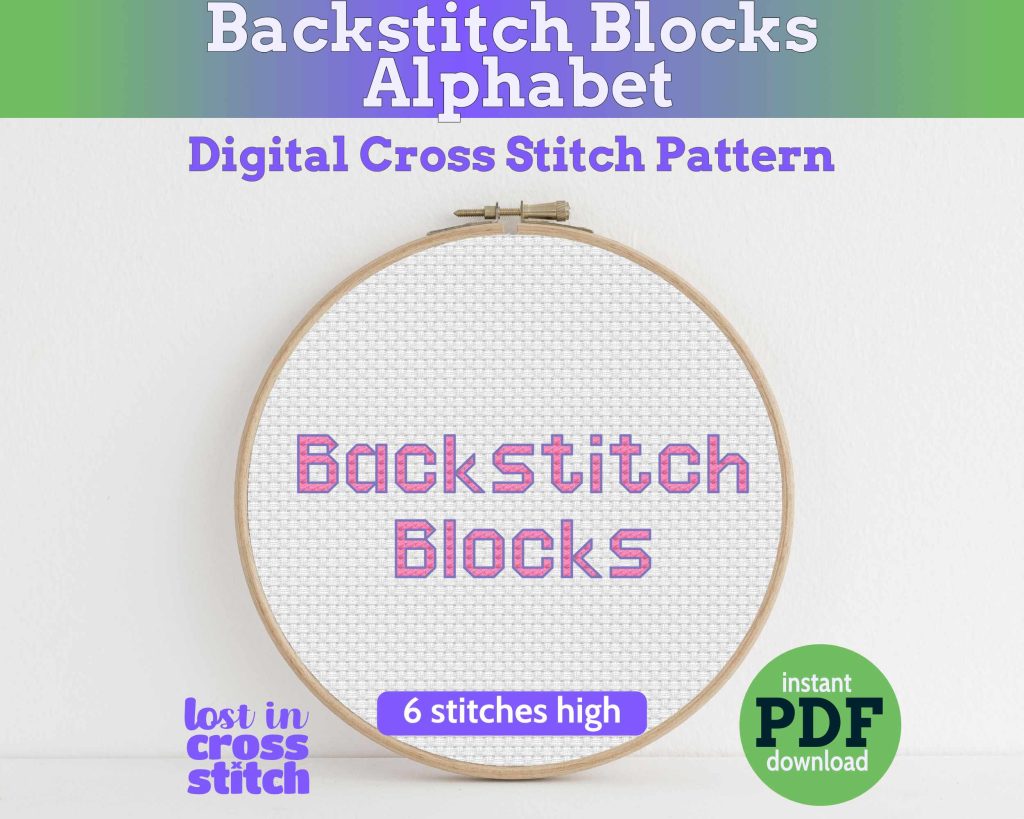
    Some alphabets use half stitches or quarter stitches to create diagonals and curves. Use them for decorative fonts and smoother lettering. They look more refined, and take a bit more attention while stitching.

    Backstitch is usual to finish the part stitch, and sometimes to outline them as well. So this style can take longer to stitch (but imo are well worth the effort).

    Backstitch Blocks Alphabet cross stitch pattern in a hoop
    Our Backstitch blocks alphabet cross stitch

    Cross plus outline alphabets

    This style of alphabet is usually kind of fun!They use full cross stitches for the main letter shape, then backstitch around the edges to sharpen it up. They’re great when you want bold, colourful letters that still read clearly, even in a busy design.

    They work well for names on gifts, headings on samplers, kids’ designs, and anything that needs a bit of personality without taking up heaps of space.

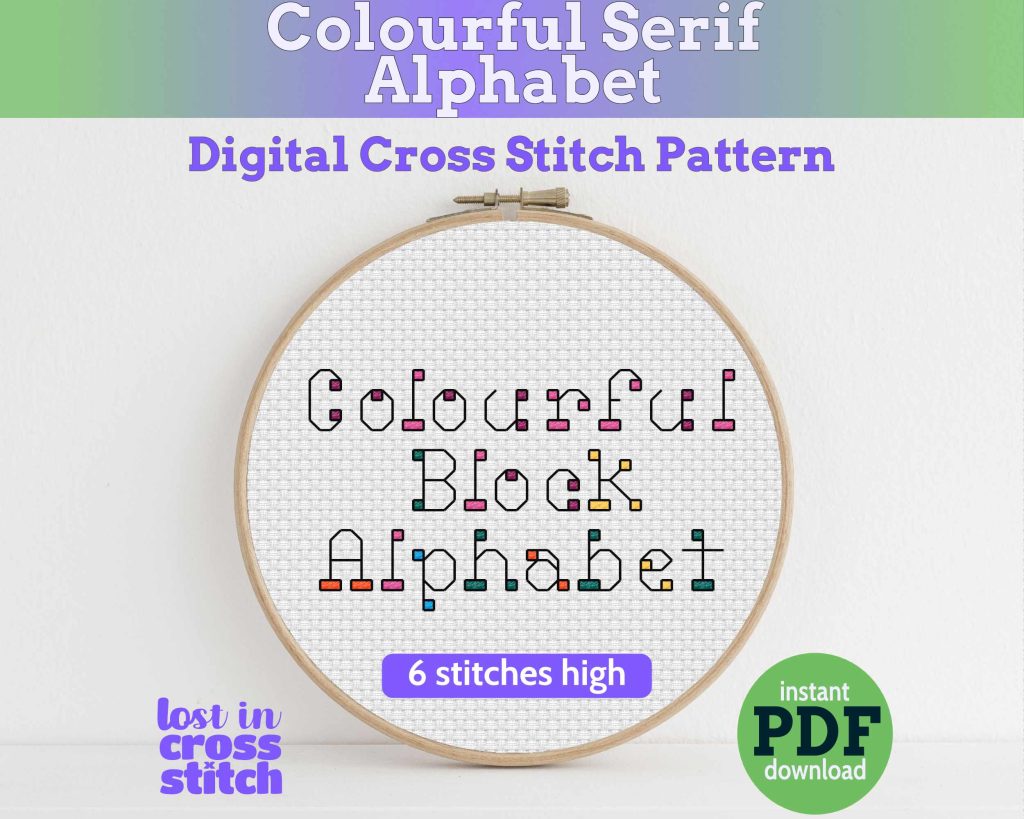
    Colourful Serif Block Alphabet cross stitch pattern stitched in an embroidery hoop
    This combination Colorful Block Alphabet is in our shop.

    Letter spacing that looks good

    Spacing can be the difference between text that looks polished and text that feels a bit “off.”

    Start with a 1 stitch gap between letters, then adjust only where it needs it.

    • Skinny letters (like I and J) can look better with an extra stitch of space beside them.
    • Wide letters (like M and W) can often sit closer to their neighbours.
    • If a word looks “broken,” one or two gaps are probably too big.
    • If letters look like they’re merging, add 1 stitch between that pair.

    Quick check: Hold your paper plan at arm’s length. If it reads clearly, you’re ready to stitch.

    Centre your text

    If you want the text centred on your fabric, do it on paper first, then place it on fabric.

    1. Find the centre point of your word on the paper plan.
    2. Mark the centre point of the area on your fabric (or the centre of the design).
    3. Line those two centres up.
    4. Start stitching at the centre, then work outwards.

    This keeps everything balanced and helps you avoid running out of space.

    Use a baseline so your word looks tidy

    A baseline is the row your letters “sit” on. You probably want your word to be in a straight line. Pick the baseline row on your planning paper first.

    On your paper plan, draw a light line across the baseline row. When you stitch, keep all letters aligned to that same bottom row.

    Ideas for bigger alphabets

    It can take much longer to make your own pattern with a bigger alphabet. Instead of the paper/pencil method, print/copy a few copies of the chart.

    Cut out each letter you need, with a one square border.

    Move each letter around on the cross stitch planning paper until you have the layout you want.

    Then glue or tape them to the planning paper to create your pattern.

    Cut out complex alphabets to make your own charts

    Stitching tips by alphabet type

    Backstitch alphabets

    • Keep tension even so lines stay smooth.
    • Stitch backstitch after nearby crosses so it stays crisp.
    Cross stitched needle case lettered Cross Stitch Needles with a purple heart

    Full cross stitch alphabets

    • If letters feel crowded, add a little more spacing.
    • Block letters often need more breathing room than you expect.

    Cross plus outline alphabets

    • Stitch crosses first.
    • Add outlines last for the sharpest finish.

    Add words to an existing pattern

    This is one of the most common ways to use alphabet charts.

    1. Choose a clear spot with enough room for the full word.
    2. Draft the text using the same paper-first method above.
    3. Place the text in the chosen area (centered or aligned).
    4. Stitch the letters, then add any outlining last.

    Tip: If the area is very busy with confetti stitches, your text can get lost. A backstitch alphabet often reads better in those spots.

    Two lines of text (names and dates)

    Two lines look best when you draft both lines before you stitch.

    • Draft line 1 on planning paper.
    • Leave 2 to 4 blank rows (depending on letter height).
    • Draft line 2.
    • Centre each line on its own, or align both to the same centre point.

    Quick troubleshooting

    My word is too wide

    • Tighten spacing in a couple of spots
    • Use a smaller alphabet
    • Use backstitch alphabet for small areas

    My letters look messy

    • Check tension
    • Move the text to a calmer area
    • Add outlines last (if the alphabet has one)

    My word looks crooked

    • Re-check your baseline row
    • Count a few letters to make sure you didn’t drift up or down while stitching

    FAQ: how to use cross-stitch alphabets

    How do you use cross-stitch alphabets to stitch a name?

    Draft the name on planning paper first, adjust spacing in pencil, then place the word on fabric using the centre-out method.

    Should I use a backstitch alphabet or a cross stitch alphabet?

    Backstitch is crisp and space-saving for small text. Full cross stitch is bolder for larger names and headings. The real trick is to use what you like, and what will fit in the space you have.

    Can I resize a cross stitch alphabet?

    Sort of, but with limits. Most cross stitch alphabets are designed for one stitch size, so resizing usually means choosing a different alphabet that’s already the size you need.

    If you try to scale letters up or down by copying them larger or smaller, the shapes can get blocky or hard to read.
    A safer option is to pick a similar font in a smaller or larger chart, or swap to backstitch lettering for tiny spaces.

    What if my fabric count changes the size?

    The alphabet stays the same in stitches, but the finished size changes in inches or centimeters. Higher-count fabric (like 18 count) makes the letters smaller, and lower-count fabric (like 14 count) makes them bigger.

    If you’re trying to fit a name into a specific space, count how many stitches you have available on the fabric, then plan the word in stitches on paper to confirm it will fit.

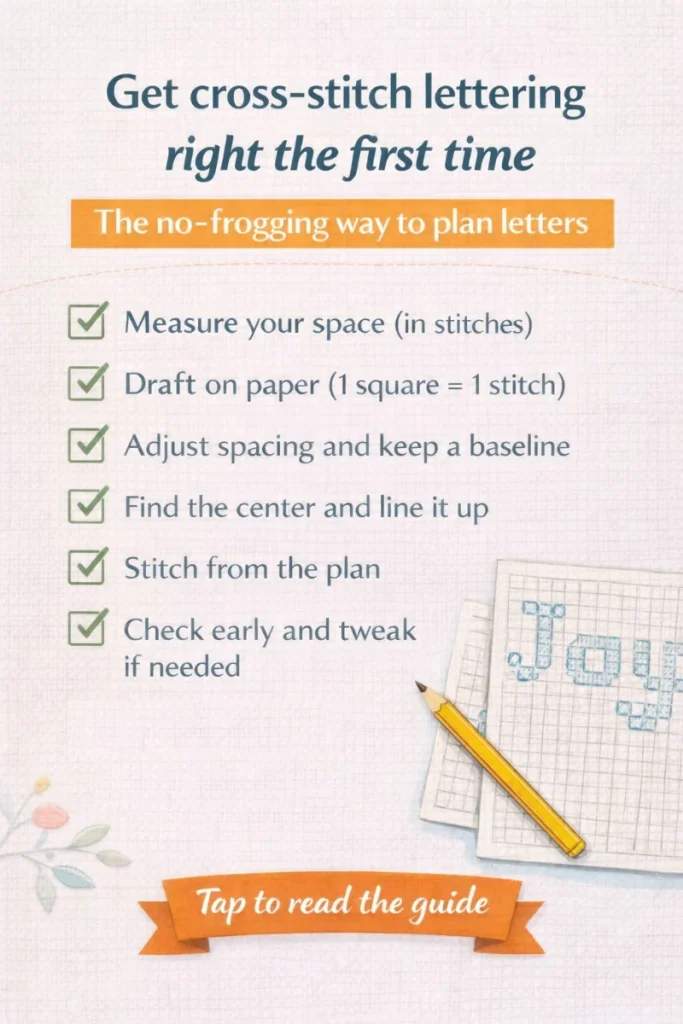
    Summary of the paper-first method

    • Pick an alphabet style that suits your project (solid stitches, outline/backstitch, or a mix).
    • Measure the space you’ve got in stitches.
    • Draft your word or motif on planning paper (1 square = 1 stitch).
    • Tweak spacing and keep letters sitting on the same baseline.
    • Find the center point and line it up on your fabric before you start.
    • Stitch from your plan and do a quick check early so you can adjust if needed.
    Checklist for getting cross stitch lettering right the first time

Browse by topic