Category: Cross Stitch Planning

Plan your cross stitch projects with a cross stitch planner, trackers and printable cards, from one-off pieces to year-long temperature projects.

  • Cross stitch bookshelf reading tracker: stitch the books you finish

    Cross stitch bookshelf reading tracker: stitch the books you finish

    If you love reading and cross stitching, you already know the vibe: just one more chapter, I’ll just finish this section. And then it’s midnight, again.

    A reading tracker turns your love of reading into something you can see. Cross stitch turns it into something you can keep.

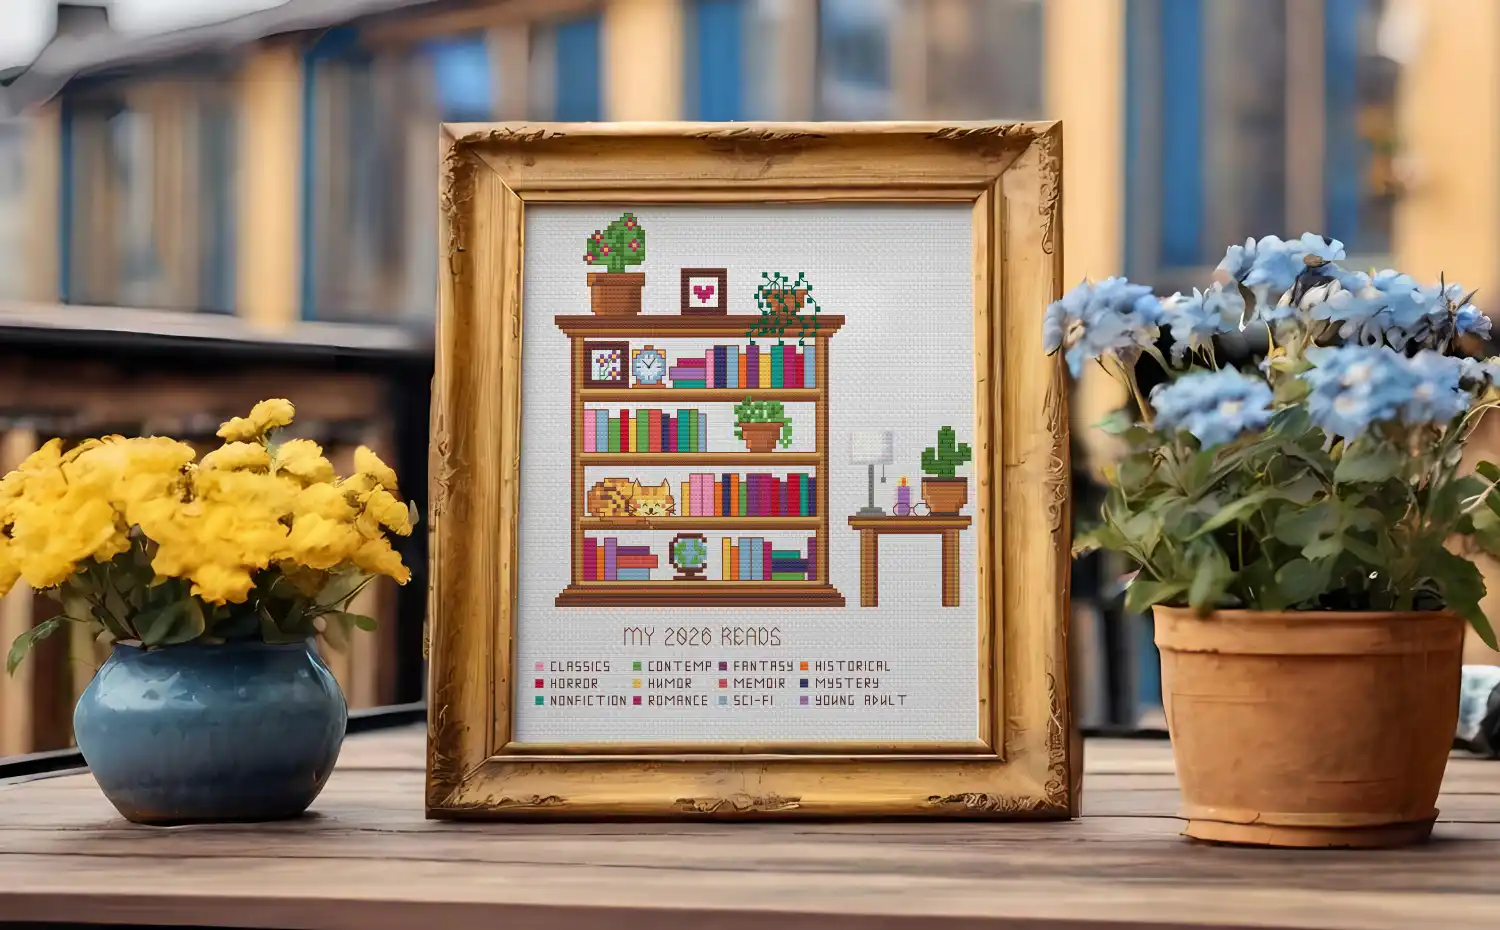
    Cross stitch bookshelf reading tracker with book spines and a genre key, framed and styled with flowers.

    Why track your reading

    Some years you remember every book. Other years you blink and it’s December.

    Tracking helps because:

    • you can see what you finished (instead of trying to reconstruct it later)
    • you notice patterns in what you reach for
    • it’s fun to look back and go, “Ohhh, that was my cozy mystery era”

    Why cross stitch works so well for a reading tracker

    As you finish a book, you choose your colour, thread your needle, choose a book spine to fill.

    When the year ends, you’ve got a beautiful, finished picture that stays with you longer than this year, just like your favourite characters in each book.

    How to make it all about you

    You can sketch your own bookshelf on cross stitch design paper or start with a ready-made pattern and customise it.

    You get to choose things like:

    • your reading goal for the year – a solid book-a-month 12, a steady 26, a busy 52, or a big hairy audacious 100-book challenge?
    • book spines: slim or chunky, tall or squat
    • layout: upright or stacked
    • tracking style: genre colours or enjoyment ratings
    • shelf extras: decorations, or a clean book-only look

    Quick start

    Once you’ve got the base stitched, the rest is the fun part. Here’s the quick start.

    1. Stitch the bookshelf and the book outlines
    2. Choose your tracking system and stitch the legend
    3. Fill one spine per finished book as you read throughout the year.
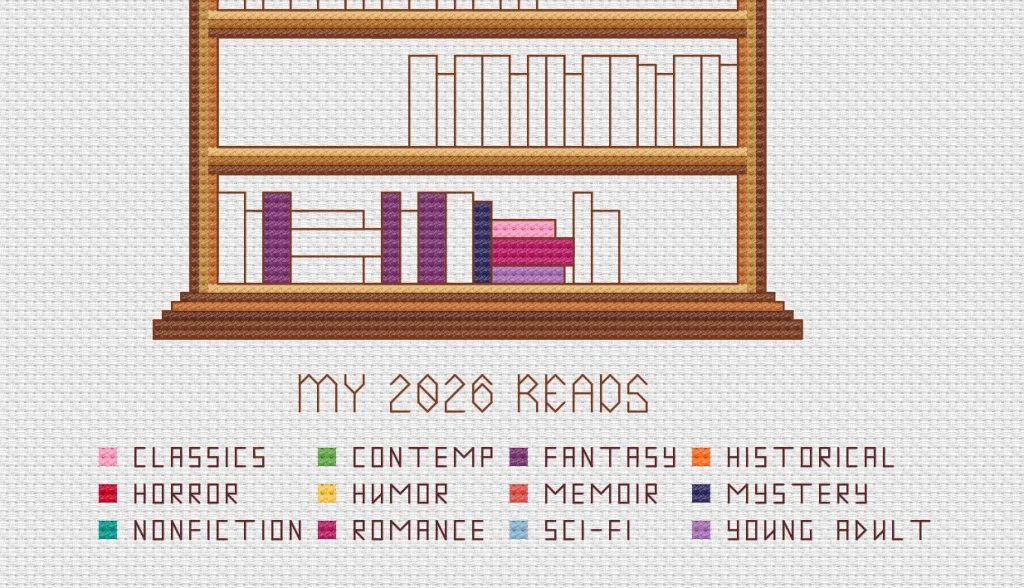
    cross stitch reading tracker bookshelf outlines stitched and ready to fill in

    Choose your pace

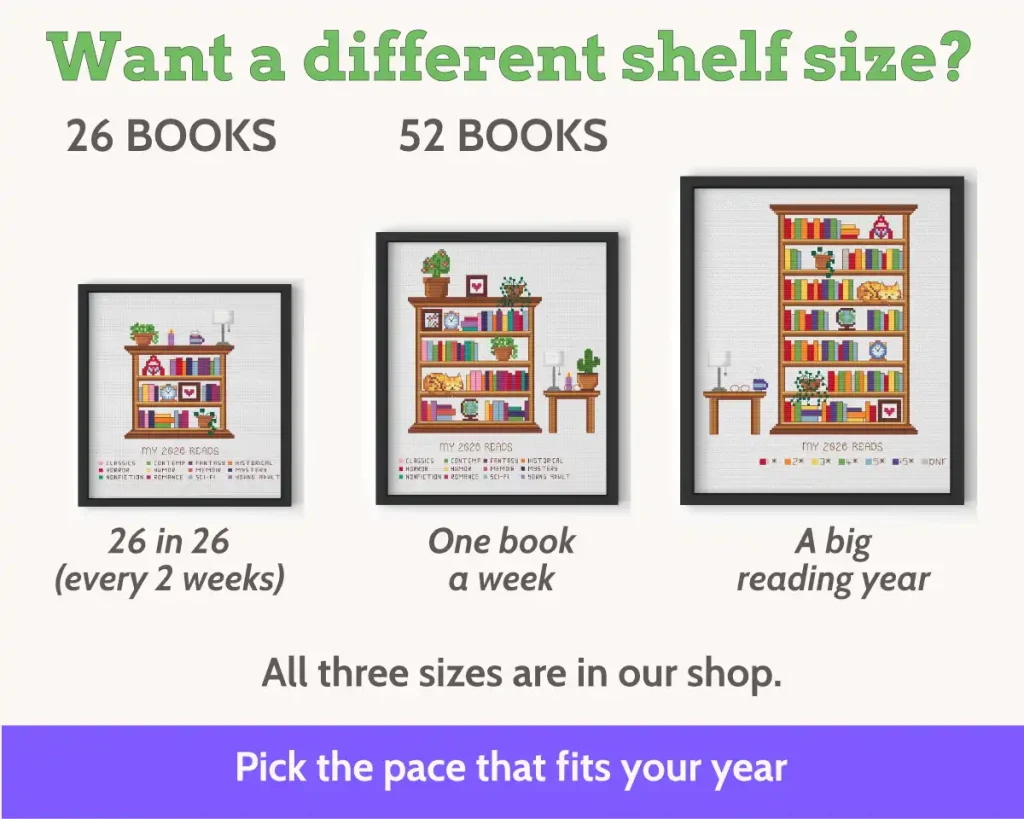
    Our bookshelf tracker pattern comes in 4 sizes so you can quickly choose the one that suits the year you’re planning.

    12 books
    A great “one a month” goal. Perfect for book club picks, seasonal challenges, and anyone who wants a smaller finished piece.

    26 books
    One every two weeks or so. Great if you want something that feels doable and gives a satisfyingly filled shelf

    52 books
    A steady, classic pace. One book a week has a nice rhythm to it.

    100 books
    A bigger statement piece. Ideal for big readers, audiobook lovers, and anyone who wants the full bookshelf look.

    Choose your size here:

    Cross stitch bookshelf reading tracker sizes 26 52 and 100 books

    How to stitch along with your reading pace

    People usually stitch this one of two ways, and either works.

    Option A: stitch the shelf and outlines first
    More work upfront. After that it’s finish a book, fill a spine, enjoy the changes.

    Option B: stitch and fill as you go
    This keeps the project feeling fresh, and it’s satisfying to stitch a spine straight after finishing a book (especially if you really like the pop that backstitching gives your piece, like I do 😊)

    You can also fill the shelf however you like:

    • finish one shelf at a time
    • jump around to balance colours or just because

    Some people want neat rows. Some people want a “real bookshelf” mix. Both end up looking great.

    What counts as a finished book?

    Simple rule: if you finished the story, it counts. If you DNF’d because it didn’t vibe, that counts too, give it a spine using your DNF option.

    For novellas or short story collections, choose a rule and use it for the year (for example, “one spine per collection” or “two novellas = one spine”).

    Ebooks and audiobooks are brilliant, but they can feel a bit invisible once you’re done. A stitched bookshelf gives you a physical “trophy” instead, a record you can actually see, one spine per finished story.

    Default is one book = one spine.

    Pick your colour system

    This is where the tracker starts to feel like your year.

    Option 1: genre colours

    Genre tracking is the most visual. Your finished shelf becomes a quick snapshot of what you read most.

    In our patterns, we’ve included a genre key that covers a solid spread (contemporary, classics, fantasy, historical, horror, humour, memoir, mystery, nonfiction, romance, sci-fi, young adult).

    If you read crossover genres (romantasy, paranormal mystery, horror-fantasy…), you’ve got a few easy ways to show it:

    • split the spine into two colours (top/bottom or left/right)
    • use one fill colour and outline a second
    • choose a “primary genre” and keep moving

    And if none of the standard genres fit your shelves, the blank key page is where you can make it yours.

    Option 2: star ratings

    Rating colours are great if you like looking back and seeing what actually landed.

    The rating key includes 1★ to 5★, a DNF option, plus a top-tier option for the books that were so good they don’t belong in the normal scale.

    Option 3: one colour for everything

    Fast, clean, simple, counting every book, fast. If you want a filled shelf and a low-fuss system, this one’s ideal.

    DNF and rereads

    DNF happens. Some books miss the mark. Some arrive at the wrong time. Some are a mood you can’t do right then.

    You can mark DNFs in a few ways:

    • use the DNF colour in the rating key
    • add a small symbol like a French knot
    • keep DNFs in a dedicated spot if you prefer your shelf to show finished reads only

    For rereads, decide whether you want them counted, then keep that rule consistent for the year.

    Track now, stitch later

    The stitched bookshelf gives you the visual story of your year. The reading log pages keep the details.

    You can record:

    • title and author
    • dates started and finished
    • genre and rating
    • notes (for the “why did I love this so much?” moments)

    This also lets you log as you go, then stitch the shelf when you’ve got more time, or want to stitch in a batch.

    Optional bookshelf decorations

    Our pattern includes optional decoration charts you can stitch into the open shelf gaps. Use none of them, use a few, use all of them.
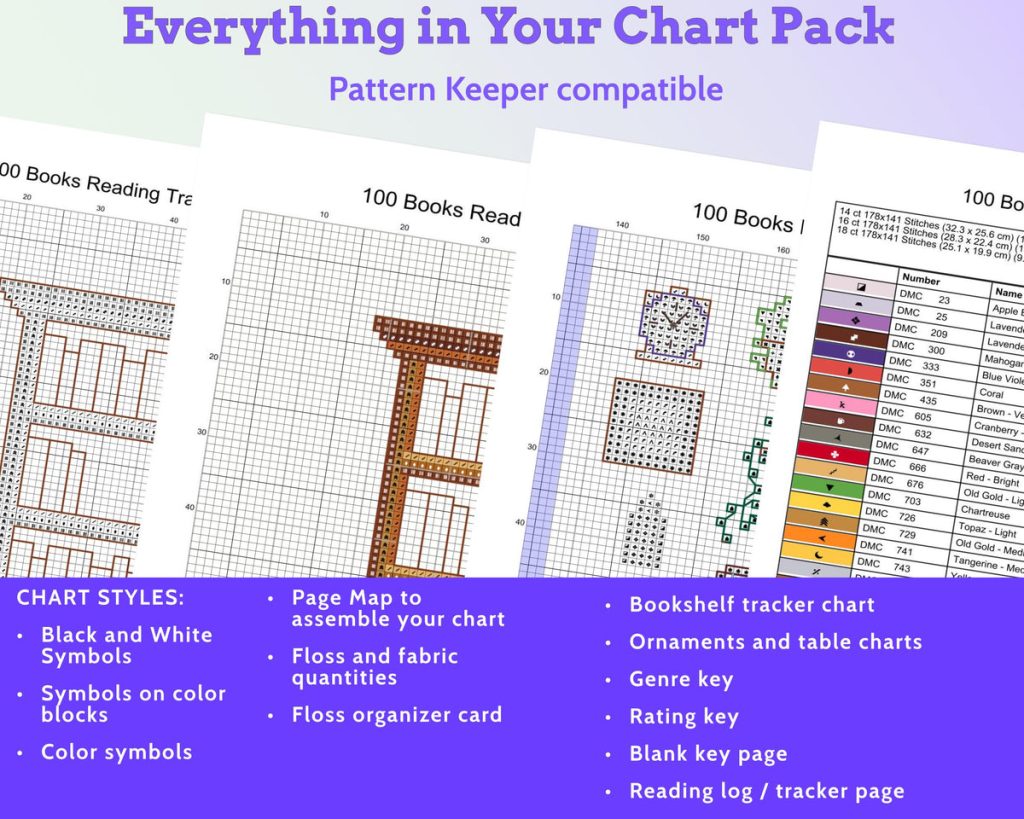
    Pages included in the cross stitch bookshelf reading tracker pattern pack

    What’s included in the pattern pack

    Each size (26, 52, or 100 books) includes the same extras, with the matching tracker chart.

    You’ll get:

    • the bookshelf tracker pattern in your chosen size
    • a genre colour key, a star rating key, and a blank key page
    • reading log pages (to keep titles, notes, and the details)
    • optional bookshelf decoration charts
    • clear, print-friendly charts (colour and black/white with symbols) plus the usual supporting pages
    • our popular Tiny Alphabet chart for customising your shelf (year, initials, short labels)

    Personalisation ideas

    • Change the year to any year you like
    • Add your name, or initials, or location, or other short label
    • Tailor the key to a personal challenge (book club picks, comfort reads, a genre challenge)
    • Stitch one as a gift and customise the categories to suit the person you’re making it for
    • Use the included Tiny Alphabet chart to stitch the year, initials, or a short label.
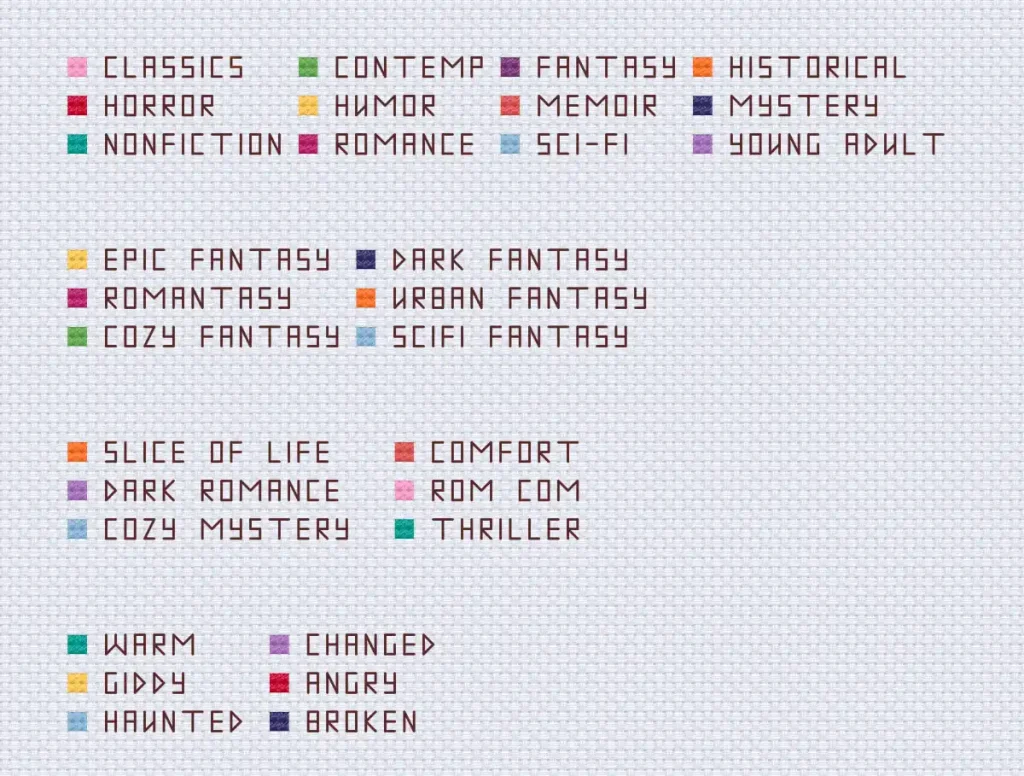
    examples of custom genres in a cross stitch reading tracker
    Use the included alphabet to create your own genre and responses labels

    Wrap-up

    If you want a tracker that feels cosy and looks great when it’s finished, a stitched bookshelf is a fun way to do it. One spine at a time, the shelf fills up, and you end up with a year you can literally see.

    Choose your size here:

    100-book bookshelf tracker

    12-book bookshelf tracker

    26-book bookshelf tracker

    52-book bookshelf tracker

    FAQ

    Do audiobooks count?

    Yes. Finished story = finished book.

    Do ebooks count?

    Yes. Finished story = finished book. The bookshelf can be a great ‘trophy’ for all the ebooks and audio books you finish.

    What if I didn’t finish a book?

    DNF is included in the rating system, so you can mark it and move on.

    Do I have to stitch the shelves in order?

    No. Fill one shelf at a time, or jump around to balance colours or just because.

    Can I change the year?

    Yes. Stitch any year you like.

    Can I make my own categories?

    Yes. The pack includes a blank key page.

    How do I track the titles of the books?

    Use the included reading log pages. The shelf gives the visual overview, and the log keeps the names and notes.

    Are the 12, 26, 52, and 100 versions different packs?

    Each size includes the same chart options. The tracker chart matches the size you choose. 

    Each pattern includes the chart for the numbered reading goal, NOT all the sizes.

  • How a Cross Stitch Planner Can Help You Enjoy Stitching More

    How a Cross Stitch Planner Can Help You Enjoy Stitching More

    A cross stitch planner can make a real difference when your projects, patterns, and supplies are stored across different places. Having a single place to plan and track your projects makes it easier to enjoy your stitching without adding pressure or rigid routines.

    When stitching can feel harder than it should

    Cross stitching, for me anyway, is a quiet, absorbing activity, but it can start to feel surprisingly effortful when details are spread out. Even when you know what you want to stitch, small points of friction can creep in and slow you down, such as:

    • Finding the chart for your part-stitched design
    • Checking whether you already have the right floss or fabric
    • Trying to remember where you left off last time
    • Looking for notes you’re sure you made somewhere.

    None of these are difficult on their own, but together they can interrupt the flow of your stitching time. Many stitchers notice this most once they have more than one project on the go (who, me?) or a growing stash of supplies, which is something we talk about more in how I organize my floss.

    Planning helps you get to the stitching faster

    When your projects are planned ahead of time, the barrier to starting gets much lower. You’re not spending the first part of your session working things out, you’re already ready to stitch.

    Planning ahead helps remove the small delays that quietly eat into stitching time:

    • Fewer decisions at the start of a session
    • No stopping to check notes or supplies
    • Easier re-entry after time away from a project

    This can be helpful if you tend to stitch in short sessions or fit stitching around other responsibilities.

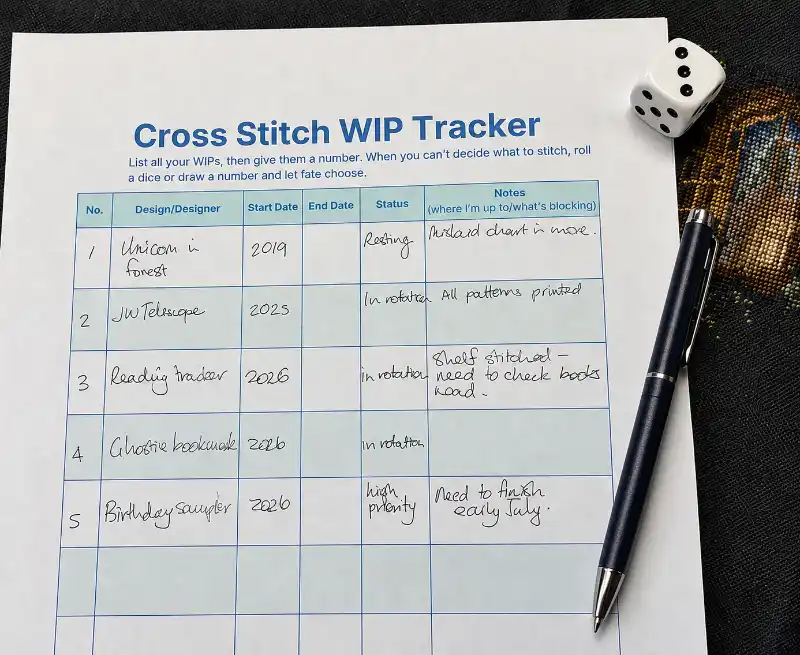
    Cross stitch WIP tracker

    Tracking gives you a way back in

    Many stitchers step away from projects from time to time. Life gets busy, energy shifts, or you just need to stitch something different for a while. If you make a quick note in your planner, when you pick up the project again, you can see where you left off and what you planned next. You’re continuing, not restarting.

    Larger or long-term projects, including things like temperature projects or multi-part designs, really benefit from this.

    Finishing feels more satisfying when progress is visible

    Finishing a cross stitch project is about more than the last stitch. It’s the feeling of completion, of seeing something through. When you write down your progress, you can estimate more accurately when you’ll finish. I love anticipating that finished piece, whether it’s framed, gifted, or finished in another way.

    A planner is useful if you’re stitching for relaxation and want to keep things feeling like a choice rather than an obligation.

    Writing things down reduces mental clutter

    When stitching details live only in your head, they tend to resurface at inconvenient moments. You might find yourself mentally reviewing plans when you’re trying to relax, or worrying you’ll forget something later.

    A planner helps by giving those thoughts somewhere to land, including:

    • Projects you want to start
    • Supplies you’re unsure you already own
    • Ideas you don’t want to forget
    • Notes you keep meaning to track

    Once you write it down, you can let it go from your memory. It could just be me, with my ADHD brain, but I notice that this lighter mental load makes stitching feel more satisfying overall. I have the finish/goal in mind so I can relax a bit more.

    Organization saves money and frustration

    As your stash grows, it becomes harder to remember exactly what you already have. So it’s easy to buy duplicates of anything because checking the drawers and bags for that one color feels harder than buying again.

    Keeping track of supplies helps reduce common frustrations, like:

    • Buying floss or fabric you already own
    • Pausing a project because something is missing
    • Digging through multiple spots mid-stitching

    A planner offers structure without pressure

    You might worry that a planner will introduce rules or expectations that take the joy out of stitching. In my experience, that only happens when a tool is treated as a ‘requirement ‘must’ rather than a support.

    A flexible cross stitch planner works with how you already stitch. You might use only a few pages regularly, return to others occasionally, or skip sections entirely. There’s no ‘right’ way to use it, just use it the right way for you.

    Organizing cross stitch patterns is easier with a planner
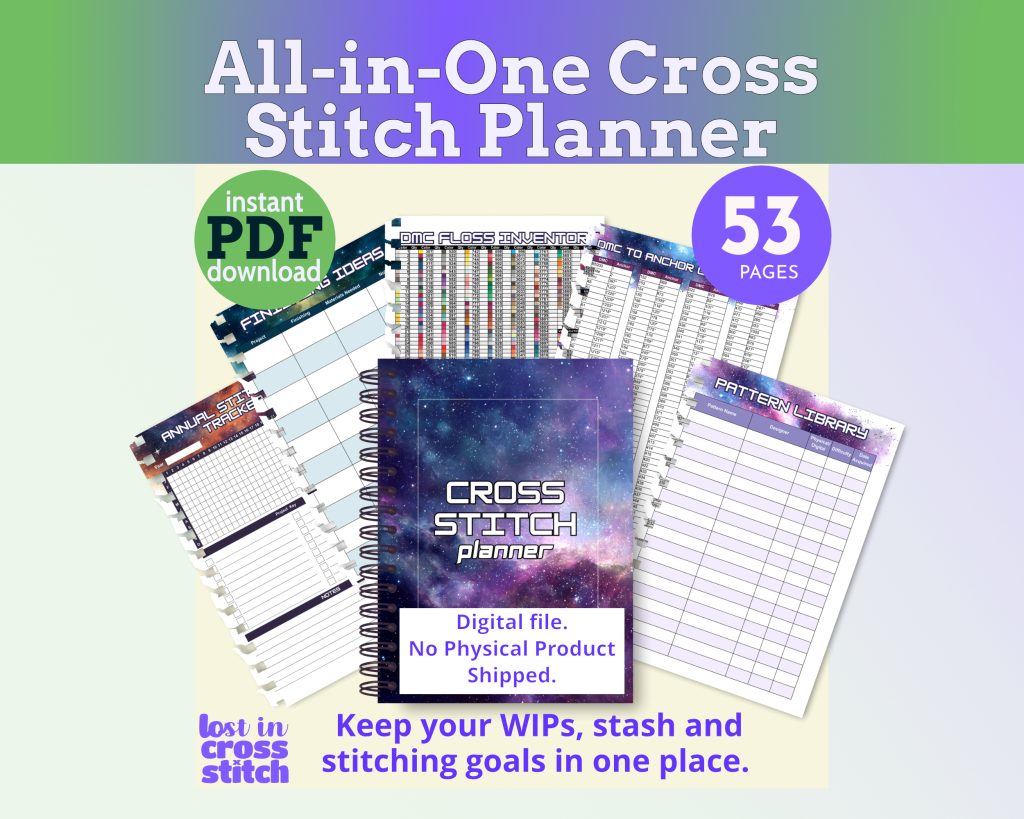
    Stash management pages from our printable cross stitch planner (available in 5 styles)

    Why a printable planner works well for cross stitch

    Many stitchers prefer paper tools because you can make notes quickly, change plans easily, and keep everything close to the project itself. This is even better when you’ve got several WIPs on the go!

    A printable cross stitch planner lets you:

    • Print only the pages you want
    • Update or replace pages as your plans change
    • Keep everything close to where you stitch
    • Avoid screens near fabric and thread

    All Lost in Cross Stitch planners are provided in both US Letter and A4, so you can print the size you need at home without resizing or adjusting layouts. And if you like A5 or Half Letter, you can print 2-to-a-page.

    You can also explore our different designs of Planners & Trackers.

    Choosing a planner style

    The pages and layout or our planners are the same across all versions, which means you can choose the aesthetic you prefer without worrying about contents.

    Frequently Asked Questions

    Do I need to use every page in a cross stitch planner?

    No. Most stitchers use only the sections that suit their needs. The planner is designed to be flexible.

    Is a cross stitch planner suitable for beginners?

    Yes. It works just as well for simple projects as it does for more complex ones. If you’re newer to stitching, you might also enjoy [Beginner’s Guide to Cross Stitch].

    Can I print only the pages I want?

    Yes. You can print the entire planner or select individual pages as needed.

    Is the planner dated?

    No. There are no fixed dates, so you can start using it at any time.

    What’s the difference between the planner designs?

    Only the appearance. The content and layout are the same.

    Does it work outside the US?

    Yes. Both US Letter and A4 sizes are included.

    All-in-one cross stitch planner printable PDF with daily calendar pages

    Bringing everything together

    A cross stitch planner doesn’t change how you stitch. It gives your projects, supplies, and plans a clear place to live, so your stitching time can feel easier to enjoy. If you want to make decisions ahead of time and write down the details you want to capture, then sitting down to actually stitch becomes easier.

    If having everything in one place sounds helpful, a printable planner can support your stitching without getting in the way.

  • How to Plan a Cross Stitch Temperature Project So You Actually Finish It

    How to Plan a Cross Stitch Temperature Project So You Actually Finish It

    A cross stitch temperature project looks simple on the surface. One tiny design every day, just half an hour stitching. One colour based on the temperature. A full year captured in thread.

    Of course you can do it.

    But… these projects often stall partway through the year. Not because the stitching is difficult, but because life. So many other demands on your time that chew into your precious stitching minutes.

    If you have ever started a cross stitch temperature project with good intentions, then quietly set it aside a few months later, you know exactly what we mean.

    This guide walks through how to plan a cross stitch temperature project in a way that makes it easier to keep going, easier to track, and much more likely to be finished.

    What Is a Cross Stitch Temperature Project?

    A cross stitch temperature project is a design stitched gradually over time, usually one row or small design per day. The colour used each day is determined by the temperature.

    Some stitchers base their project on:

    • The daily high temperature
    • The daily low temperature
    • The daily average temperature

    By the end of the year, the finished piece becomes a visual record of the year’s weather patterns and changing seasons, translated into a vibrant design you’re proud to display in your home.

    It is a creative and meaningful project, but it is also a long commitment. That is why planning matters more here than it does for most other cross stitch designs.

    Want the planning part done for you? Use our printable Temperature Project Card Pack (°C + °F) to plan your ranges, record your colours, and track the year.

    Instant download, print, and use every year.

    Why Many Cross Stitch Temperature Projects Do Not Get Finished

    Most unfinished temperature projects fail for the same few reasons. Motivation is rarely the issue.

    Common challenges stitchers run into

    • Colour choices were rushed and don’t feel balanced
    • Not all colours were in their stash and they keep meaning to pick up that missing one, but somehow….
    • Temperature ranges overlap or leave gaps
    • There is no clear system for tracking daily temperatures
    • Notes are scattered across notebooks, apps, or scraps of paper
    • Falling behind feels discouraging, so the project gets avoided

    A cross stitch temperature project does not need more effort. It needs fewer decisions.

    Plan First, Stitch Later

    Making decisions early helps to make stitching out the design a delightful experience every day (or week/month, depending how often you can commit.)

    Planning ahead means:

    • You choose your colours once
    • You define your temperature ranges once
    • You decide how you will track temperatures once

    After that, the project becomes routine and enjoyable, rather than mentally heavy.

    Step 1: Decide Which Temperature You Will Stitch From

    Before choosing colours, decide which temperature you are actually recording. Common options are:

    • Daily high
    • Daily low
    • Daily average

    There is no right or wrong choice. What matters is consistency. Pick one method and use it for the entire project.

    This decision affects:

    • How often colours change
    • How much variation appears in the finished piece
    • How predictable your daily stitching becomes

    Write this decision down somewhere permanent. You do not want to rely on memory months later.

    Step 2: Choose Sensible Temperature Ranges

    Temperature ranges matter more than individual colours.

    Too many narrow ranges can feel overwhelming. Too few wide ranges can make the finished piece look flat.

    A balanced approach usually works best

    • Narrower ranges around common temperatures
    • Wider ranges at extreme highs and lows
    • Clear coverage so every possible day fits a range

    This avoids the frustration of checking the temperature and not immediately knowing which colour to use.

    Step 3: Plan Your Colour Flow, Not Just Your Colours

    A cross stitch temperature project is essentially a long colour gradient.

    When choosing colours, look at:

    • How colours transition from one range to the next
    • Whether the gradient feels smooth
    • Whether extreme temperatures are visually distinct.

    Laying floss out in order from coldest to warmest before committing to a final choice can help you spot awkward jumps early.

    Many stitchers prefer starting with a suggested colour progression and adjusting it, rather than building a full palette from scratch.

    Want this to be easy? Use our printable Temperature Project Card Pack (°C + °F) to plan your ranges, record your colours, and track the year.

    Why a Temperature Project Kit Solves These Problems

    One of the most useful ways to make a long project feel manageable is to treat it as its own kit from the beginning.

    Your temperature project kit doesn’t need to be elaborate. A small project bag or case is often enough, as long as everything the project needs ‘lives’ together.

    When you treat your temperature project as its own long-term setup, it becomes much easier to pick up and put down without friction.

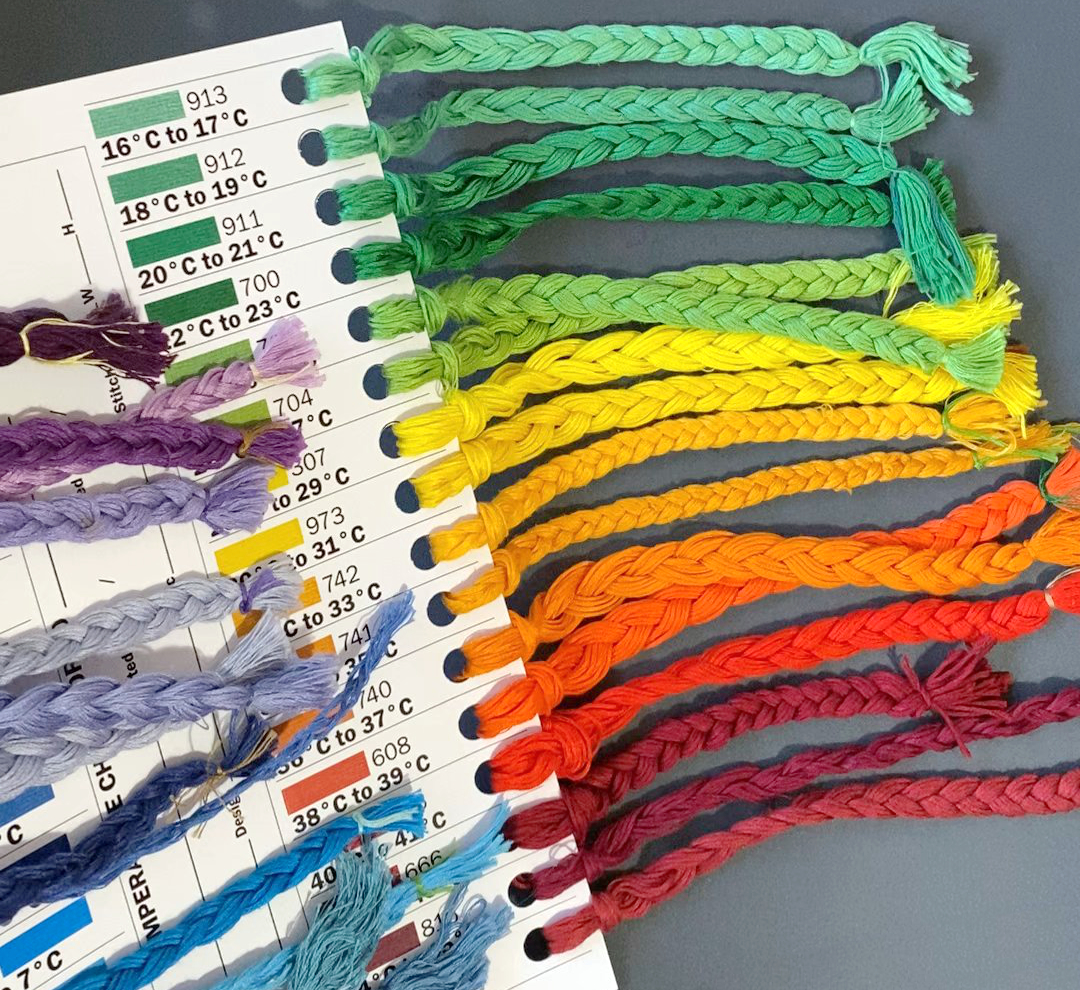
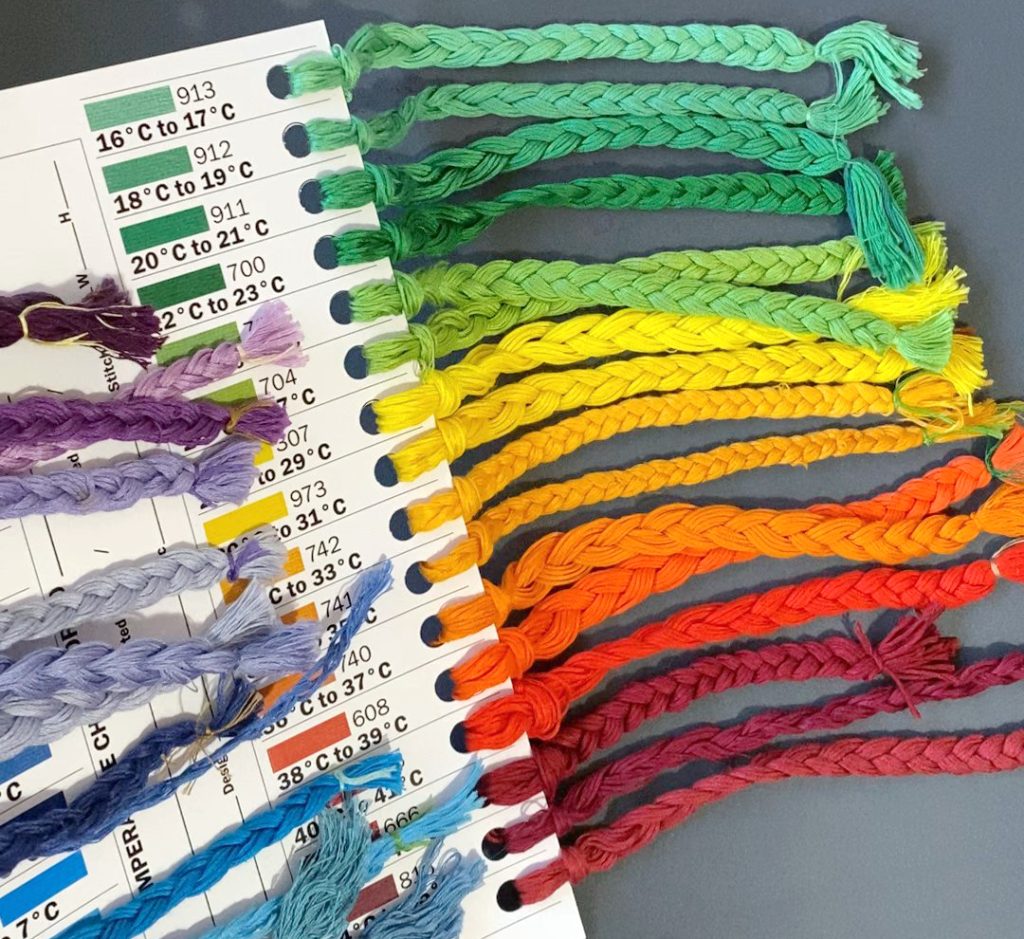
    temperature project card with floss loaded

    What To Put Into Your Temperature Project Kit

    Most stitchers find it helpful to keep these items together:

    • Fabric and pattern
    • All floss chosen for the full temperature range
    • A single reference sheet you fill in every day, showing which colour matches which temperature
    • A place to record temperatures every day, as the project progresses.

    Keeping everything in one place means you aren’t reassembling the project every time you want to stitch. You open the bag, check the reference, and continue.

    Want the planning done for you? Use our printable Temperature Project Card Pack (°C + °F) to plan your ranges, record your colours, and track the year.

    Why This Matters Over a Long Project

    A dedicated kit quietly solves several common problems.

    • It reduces rummaging for colours last used months ago.
    • It stops second-guessing decisions already made and approved.
    • It gives you more time to actually do your stitching because everything is right where you need it.
    • It also helps prevent those dreaded thread orphans.

    One Reference Point Makes a Big Difference

    Many temperature projects become hard to maintain because information is scattered. When you make your own temperature project kit:

    • Colour reference chart is written down in one place.
    • Your temperature record is easy to add to and refer to
    • Project details are outsourced so you don’t have to try to remember the details.

    You can simply check your planner, and enjoy stitching.

    That small amount of structure often makes the difference between staying steady and quietly falling behind.

    Step 4: Make Tracking Easy, Not Perfect

    Daily tracking sounds ideal. Real life does not always cooperate.

    A good tracking system allows for:

    • Recording temperatures daily or weekly
    • Catching up later without stress
    • Backfilling missed days using historical weather data

    Many stitchers update their records once a week rather than daily. Others enjoy a short daily check-in. Both approaches work if the system supports flexibility.

    Tracking should feel quick and easy, not like another task to keep up with.

    What to Do If You Fall Behind

    Falling behind is almost normal in a year-long cross stitch temperature project. It doesn’t mean the project has failed.

    Simple ways to catch up

    • Use a weather website to find historical temperatures
    • Record several days at once
    • Stitch a short catch-up session without worrying about speed

    A structured monthly layout makes catching up far easier than scattered notes ever could.

    The important thing is that catching up feels possible, not discouraging or overwhelming.

    A Finished Cross Stitch Temperature Project Is Built on Small Decisions

    The most successful temperature projects are not the most ambitious ones at the start. They are the most organised.

    When planning is calm and tracking is simple:

    • Stitching stays enjoyable
    • Missed days do not derail your progress
    • The project stays visible instead of being tucked away

    Printable Cross Stitch Temperature Project Cards (recommended kit)

    If you like the idea of setting up a temperature project kit but don’t want to design your own reference sheets from scratch, our printable temperature project card set can help you plan and track your cross stitch temperature projects every year.

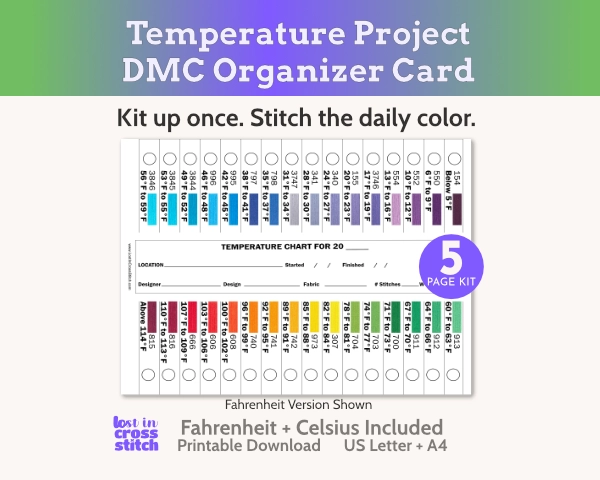
    cross stitch temperature project floss card

    It can to live inside your temperature project bag/case/box. It contains:

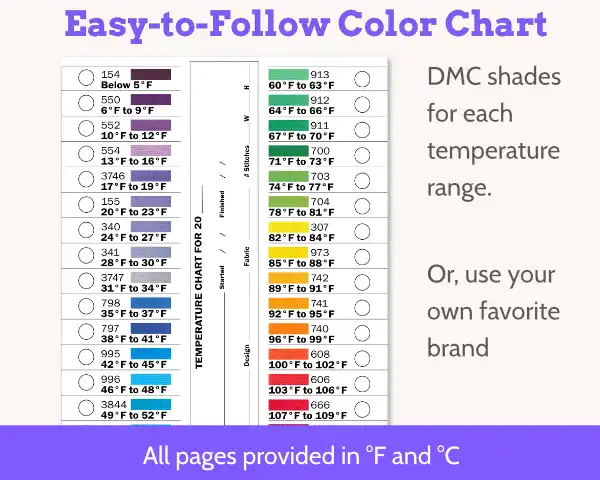
    • Temperature ranges and chosen DMC colours
    • Project details
    • A structured way to record temperatures as you go

    Because it is printable (and available in Fahrenheit and Celcius), you can use it for multiple projects, reprint if plans change, or keep a fresh copy with each new design.

    A little preparation at the beginning can make a year-long project feel far more approachable.

  • Tools for Your Cross Stitch Temperature Project

    Tools for Your Cross Stitch Temperature Project

    Temperature project DMC organiser card printable with a row of colour swatches

    If you’ve ever wanted to stitch your way through the seasons, a cross stitch temperature project is one of the most rewarding ways to do it. Each colour tells the story of a day, a little moment of weather and life stitched into fabric. By the end of the year, you’ve created something beautiful, personal, and completely unique to your corner of the world.

    But as anyone who’s started one knows, the creative idea is the easy part. Keeping everything organised for twelve months? That’s the challenge. Between daily temperatures, DMC colour ranges, and project notes, even the most dedicated stitcher can lose track.

    That’s why we created a printable toolset to take care of the practical side, so you can focus on the stitching itself.

    It’s never too early, or too late, to start planning your temperature project. Whether you’re preparing for the new year or picking up mid-season, these printables make it easy to begin anytime.

    Why Stitchers Love Temperature Projects

    Temperature projects blend creativity with mindfulness. You get to design something meaningful, stay connected to your craft all year, and end up with a one-of-a-kind record of your year in colour.

    They’re also wonderfully flexible. You can stitch daily or weekly. Daily stitching builds a smooth gradient and a calming habit, while weekly batching makes it easy to catch up when life gets busy.

    And there’s no single right way to track the weather. Some stitchers prefer to record the day’s high, others the low, or even the average. The important part is staying consistent, so your final piece reads clearly from January to December.

    The Organising Challenge No One Warns You About

    Most stitchers start their project full of enthusiasm. The colours are chosen, the pattern looks exciting, and January begins with perfect consistency. Then, life happens — a week away, a forgotten note, a sick family member, a missing DMC skein — and suddenly it’s hard to pick it up and catch up.

    Temperature projects work best when everything is simple, visual, and easy to check at a glance. That’s what keeps them fun instead of fiddly.

    These are the problems we’ve tried to solve with our Temperature Project Printable Cards.

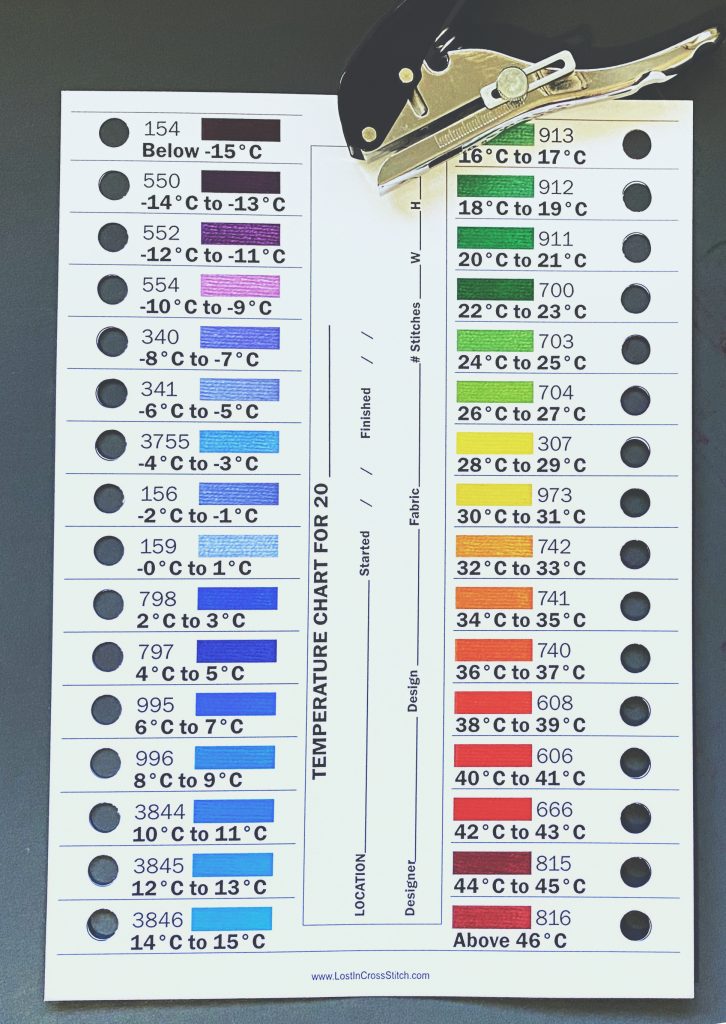
    cross stitch temperature project card loaded with floss
    Our cross stitch temperature project card, printed and loaded with floss

    A Complete Printable Set for Your Temperature Project

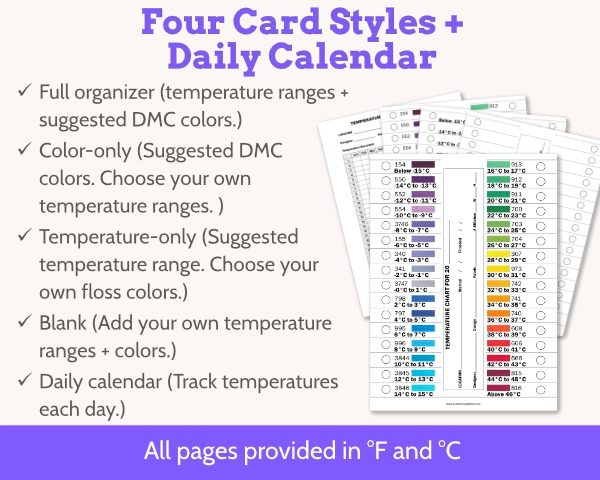
    This set includes four different floss organiser cards plus a one-page stitching calendar, all designed to keep your project running smoothly from day one to day 365.

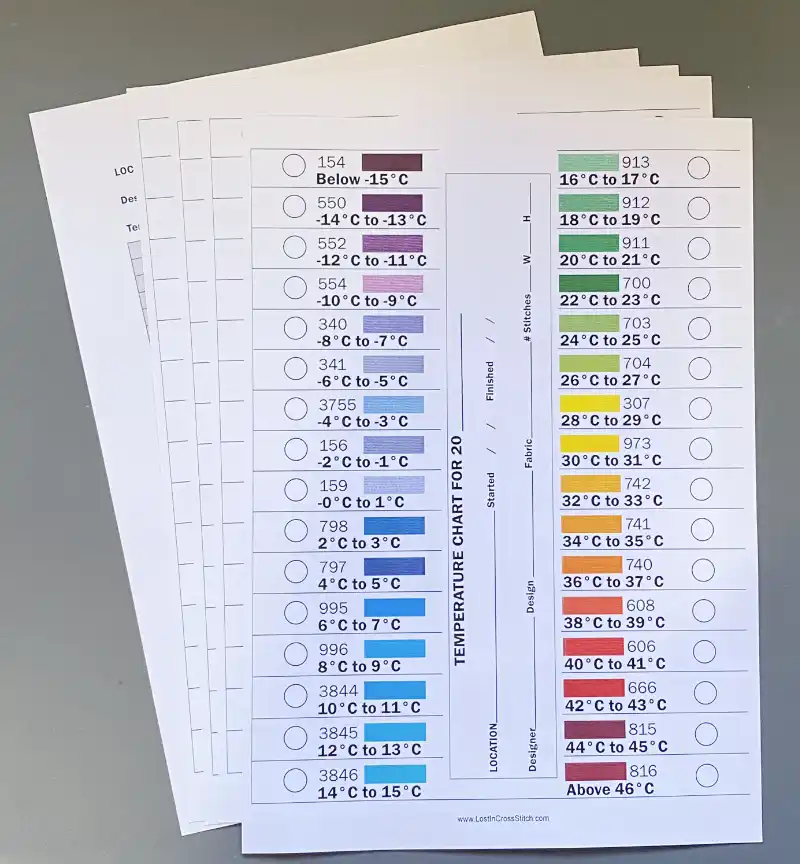
    Four temperature project card styles and a daily calendar, in Fahrenheit and Celsius

    The Floss Organizer Cards

    Choose whichever version suits your stitching style:

    • Suggested DMC Colours + Temperature Ranges in both °C and °F.
    • DMC-Only Card if you already know your local ranges.
    • Temperature-Only Card if you prefer to build your palette from scratch or from your own preferred floss brand.
    • Blank Card with space for your own temp range and colour selections.

    Each version keeps your entire project floss set visible at a glance. Just loop your floss through the holes, and your temperature reference stays clean, compact, and portable. The cards help you define temperature bands that fit your local climate, so your DMC colour key reflects real seasonal shifts.

    The Printable Daily Calendar

    The matching calendar gives you a simple way to record each day’s high (or low) and note the DMC number you used. It’s a single sheet — twelve months on one page — designed for quick daily updates.

    If you miss a few days, just check your calendar, grab your floss, and pick up right where you left off.

    How to Use the Set

    1. Print your preferred card and calendar — all pages come in both °C and °F, formatted for A4 and US Letter.
    2. Choose your palette — start with the pre-filled version or customise your own.
    3. Punch the holes to hold your floss (10mm or 3/8″ punch)
    4. Record each day’s temperature on the calendar.
    5. Check your card before stitching to make sure you’re using the right colour for that day’s range.
    6. Keep everything together in your project bag or folder so you can stitch anytime, anywhere.

    These tools work with any layout — temperature stripes, tiny motifs, or a twelve-month grid. Whatever pattern you choose, the organiser and calendar keep the colour logic clear all year.

    Works for Any Temperature Stitch Along

    Every temperature stitch along has its own twist. Some follow a traditional stripe layout, others use wheels, motifs, or monthly panels. No matter which version you choose, these printables fit right in.

    Use the organiser cards to match your chosen colour scale and keep thread references consistent across months or motifs. The calendar helps you log temperatures, progress, or catch-up days without losing track of your range or palette.

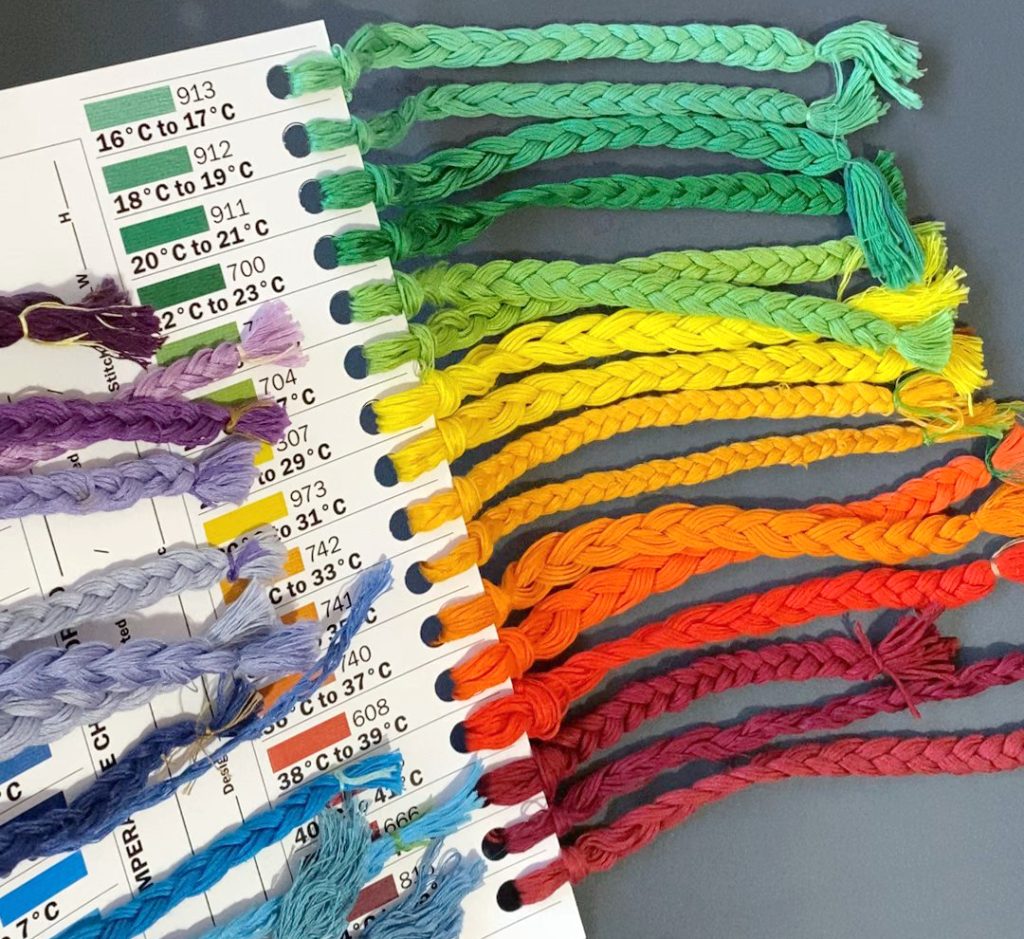
    cross stitch temperature project card, printed and punched
    cross stitch Temperature project card, printed and punched

    If you’ve joined a SAL but prefer different colour choices, you can easily build your own palette. The blank card lets you create a custom floss project card that matches your taste, fabric, and climate.

    Whether you’re joining a global SAL or following a local one, this set keeps your floss, notes, and tracking tidy from start to finish. And you do use a project bag, don’t you?

    Tips for a Smooth Stitching Year in Your Cross Stitch Temperature Project

    • Pick a time each day (morning or evening) to log your temperature.
    • Stick with your chosen measure — high, low, or average — for consistent results.
    • Keep motifs simple and batch-stitch when life gets busy.
    • Use a pencil for your calendar if you like to adjust later.
    • Take a photo of your project each month to watch your year unfold in colour.
    • Find reliable daily data at timeanddate.com

    Stitch Your Year in Colour

    Predefined DMC colour chart and temperature range cards

    A cross stitch temperature project doesn’t have to be complicated. With a clear layout, pre-organised colours, and a single-page calendar, you’ll have everything you need to stay consistent from January to December — no spreadsheets or guesswork required. And you can begin recording your year in colour at time!

    Keep your project simple, tidy, and ready to stitch with the Printable Cross Stitch Temperature Project Card and Calendar Set — available now in °C and °F. Explore the full set here →

Browse by topic