
Knowing how to calculate cross stitch fabric size before you cut saves fabric, money, and frustration. This guide walks through the formula, explains why margins matter more than you might think, and includes a quick reference table for different finishing methods.
We also review the most popular free online calculators so whether you prefer to do the maths yourself or let a tool handle it, you’ll know exactly how much fabric to cut.
The Quick Answer
This is the formula:
Divide your stitch count by your fabric count to get your finished design size in inches. Then add 2–4 inches on each side for finishing margins. If you’re stitching over two on linen or evenweave, halve the fabric count first.
The rest of this post explains why it works, what happens when you skip steps, and how to choose the right margin for your finishing method. Plus we give you a handy reference table to keep in your stitching kit.
The Simple Formula (Step by Step)
Calculating fabric size comes down to four steps, and you need to complete all four before you put your scissors near your fabric:
Step 1: Know how you’ll finish the piece
Your finishing method determines how much margin you need—so it’s worth deciding before you cut. Hoop finishing needs less extra fabric than professional framing. A pillow needs seam allowance. If you’re not sure yet, plan for the most fabric-hungry option you might choose, so you don’t close off possibilities later.
Not sure what your options are? Our guide to finishing methods covers over 20 ways to finish cross stitch, from hoops to cushions to professional framing and more.
If you like to have all your project details in one place before you start, our Cross Stitch Organizing Bundle helps you plan, track, and finish your stitching projects.
Step 2: Find your stitch count
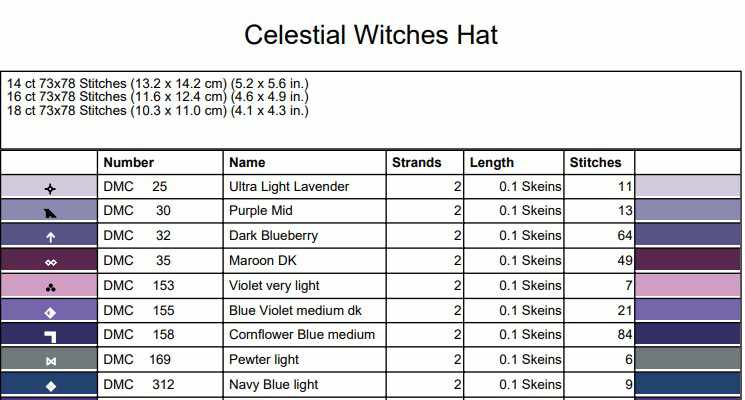
Your pattern should list the design dimensions in stitches—something like “140w × 200h” or “140 × 200 stitches.”
It’s often on the pattern details page. Our guide to cross stitch patterns for beginners has a section on fabric too.
Step 3: Divide by fabric count
Fabric count tells you how many stitches fit in one inch of your fabric. Divide your stitch count by your fabric count to get the finished design size in inches.
Example: A 140 stitches wide × 200 stitches high stitch design on 14-count Aida:
Width: 140 stitches ÷ 14 count fabric = 10 inches fabric
Height: 200 stitches ÷ 14 count fabric = 14.3 inches fabric
New to fabric count? Our beginner’s guide to Aida fabric explains how it all works.
Step 4: Add extra fabric for finishing
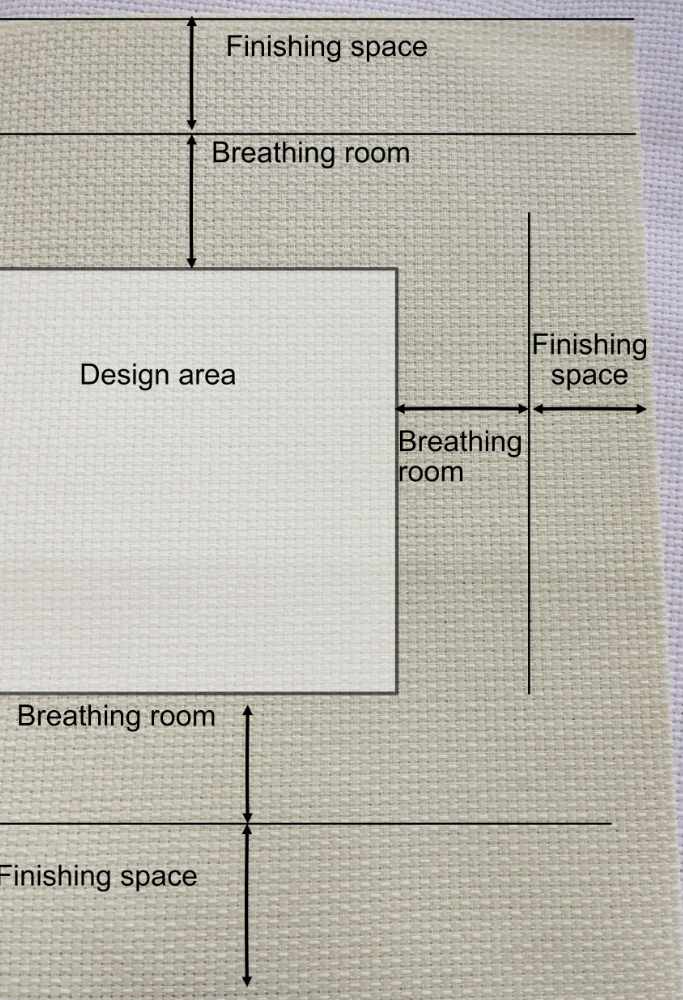
This is the step people skip and regret. You need extra fabric both for visual breathing room and for the practical business of finishing. How much depends on your preferences and your finishing method.
4a. Breathing room around the design
This is the empty fabric you’ll see between your stitching and the edge of the hoop or frame, the visual border. How much is completely your personal preference, but 1–2 inches on each side is common. If you prefer your design right to the edge, or you’re doing a full-coverage piece, skip this.
Continuing our example using 2″ each side of the design:
Width: 10″ for design + 4″ (2″ left and 2″ right) for breathing room = 14″ wide
Height: 14.3″ for design + 4″ (2″ top and 2″ bottom) for breathing room = 18.3″
4b. Margins for your finishing method
This is the fabric you won’t see. It’s what gets wrapped, tucked, or laced behind the frame or hoop. How much you need depends on how you’re finishing the piece (see the table below).
Continuing our example: Adding 2″ finishing margins per side for professional framing:
Width: 10″ design + 4″ breathing room + 4″ finishing = 20″
Height: 14.3″ design + 4″ breathing room + 4″ finishing = 22.3″ (round up to 23″)
Cut your fabric to 20″ × 23″.
Why Margins Matter More Than You Think
Margins aren’t just “nice to have.” They’re functional. Without enough fabric around your design:
Hooping becomes impossible. Your hoop needs something to grip. If the design runs to the edge, there’s nothing to hold. Then you’re
Framing gets difficult or expensive. Framers need fabric to wrap around the backing board and create tension. Too little margin means your options shrink or disappear.
You limit your future choices. Maybe you’re planning to hoop-finish this piece, but what if you change your mind later and want to frame, or do a wall hanging? Cutting generous margins now keeps your options open.
And here’s the thing: you can’t add Aida fabric back. Once it’s cut, it’s cut. Wasting a bit of fabric (even the pricey stuff) is so much better than discovering halfway through a project that you’ve run out of room. I promise you, you’ll never finish that stitch. It’s heart-breaking.
Not sure which finishing method you’ll use? Our guide to finishing methods covers over 20 options, from hoops to pillows to professional framing.
Quick Reference: Margins by Finishing Method
Different finishing methods need different amounts of margin. Remember to first add optional breathing room of 1–2″ each side, 2–4″ total visible space around your design.
| Finishing Method | Margin Per Side | Total Added | Notes |
| Display hoop | 2” (5 cm) | 4” (10 cm) | Enough to tuck and secure behind the hoop |
| Standard frame | 3” (7.5 cm) | 6” (15 cm) | Room for stretching and mounting |
| Professional lacing | 4” (10 cm) | 8” (20 cm) | Framers need extra for tensioning |
| Self-framing (foam board) | 3” (7.5 cm) | 6” (15 cm) | Similar to standard framing |
| Pillow or ornament | 1–2” (2.5–5 cm) (more if it’s a small design going onto a large pillow) | 2–4” (5–10 cm) | Seam allowance plus handling room |
| Not sure yet | 3–4” (7.5–10 cm) | 6–8” (15–20 cm) | When in doubt, go bigger |
For more on pillows, ornaments, and other finishing options, see our posts on cross stitch decor.
Worked out your fabric size? The next job is preparing it properly. Here’s how to set up your fabric for stitching, including finishing the edges so they don’t fray while you work.
Common Mistakes That Waste Fabric (or Ruin Projects)
Forgetting to halve the count for over-two stitching
This is the one that catches people out. When you stitch over two threads on linen or evenweave, your effective stitch count is half the thread count.
28-count linen stitched over two = 14 stitches per inch (not 28).
Miss this, and your finished design will be twice the size you expected. That’s either a very expensive mistake or a very different project than you planned.
(If “over two” is new to you, our cross stitch glossary explains all the terminology.)
Not accounting for the finishing method
You calculated the stitched size perfectly—but forgot you need 4” margins for professional framing. Now you’re short. This is especially painful when the stitching is already done.
Trusting “it’ll fit” without doing the maths
Eyeballing is not a strategy—especially when you’re working with specialty fabric that costs real money. Thirty seconds with a calculator beats thirty hours of re-stitching.
Assuming the pattern’s listed size applies to your fabric
Many patterns list finished size for one specific fabric count (often 14-count Aida). If you’re using a different count, that number doesn’t apply to you. Always recalculate for your actual fabric.
Free Fabric Calculators
If maths isn’t your thing, these free online calculators do the work for you. They all do something slightly different so have a look at them all and choose the one that does what you need.
Important note: Most calculators give you design size plus a generic finishing margin. They don’t account for breathing room. So if you want visible space around your design, add that to your total margin before using the calculator.
Thread-Bare.com We really like this one. It shows results for multiple fabric counts side by side, which is useful if you’re still deciding which count to use. It starts with example measurements, very helpful.
Lord Libidan Enter your numbers, get your answer in inches and centimetres. Very handy feature to also add your finishing dimension. Also gives you needle and floss size recommendations.
123Stitch.com Separate calculators for Aida and linen/evenweave, and allows for extra finishing size.
Needlework Tips & Techniques Includes a toggle for over-one vs over-two stitching, plus margin guidance built in. Good if you’re working on evenweave and want to double-check your thinking.
Yarn Tree Also very comprehensive – actually suggests needle size, strands of floss etc.
Our free printable Aida Ruler helps you identify your fabric size quickly and accurately. It’s part of our free Cross Stitch Planning Starter Kit.
FAQ
How much extra fabric do I need for cross stitch?
Add 2–4 inches per side depending on your finishing method. Hoops need less (2”); professional framing needs more (4”). When in doubt, add 3–4 inches and keep your options open.
What if I’m stitching over two on linen?
Halve the thread count first. 28-count linen stitched over two gives you 14 stitches per inch, the same as 14-count Aida. Use that number in your calculations.
What happens if I cut my fabric too small?
You may not have enough margin to finish the piece properly, or at all. It’s one of the most frustrating mistakes in cross stitch because there’s often no fix. For damage control options, see our post on dealing with cross stitch mistakes
Do I measure the fabric count or the stitch count?
Both matter. Fabric count is how many holes (or threads) per inch. Stitch count is how many stitches in your design. Divide stitch count by fabric count to get finished size in inches.
Can I use a calculator instead of doing the maths?
Absolutely. The free calculators listed above handle everything, including the over-two adjustment for linen. Just double-check that you’ve entered the right numbers.
What to Read Next
Now that you know what size to cut, here’s where to go next:
Setting Up Fabric for Cross Stitch – How to cut, edge, find centre, and hoop your fabric ready for stitching.
20 Ways to Finish Cross Stitch – Not sure how you’ll finish yet? Browse your options before you commit.
Cross Stitch Terms – If any of the terminology in this post was unfamiliar, start here.
A minute of maths now saves hours of heartbreak later. Cut with confidence, and happy stitching!
New to cross stitch? Our cross stitch for beginners guide brings all the basics together in one place.



Leave a Reply