
Frogging cross stitch is part of learning and part of finishing a piece you’re happy with. Knowing how to do it safely can save time, reduce frustration, and help protect your fabric.
If you’re new to cross stitch, frogging simply means undoing stitches after a mistake. It’s not fun, but it’s very normal, and it happens to every stitcher at some point.
This guide explains what frogging is, when it’s worth doing, when you can leave a mistake alone, and how to frog stitches without damaging your fabric or your sanity.
What is frogging cross stitch?
Frogging is the process of ripping out stitches you’ve already completed.
The name comes from “rip it, rip it,” which sounds a bit like a frog saying ribbit. The term is used across many crafts, including knitting, crochet, embroidery, and sewing.
In cross stitch, frogging usually happens because of:
- A counting mistake
- The wrong colour being used
- A stitch landing in the wrong place
- A pattern error you notice too late
None of these mean you’re bad at stitching. They just mean you’re stitching. On a recent stitch I did, it wasn’t obvious which way was up. So TWICE I spent an entire evening stitching the section, only to realise the following night that I’d been stitching upside down. As if once wasn’t enough…. anyway, thank goodness for gridding, it saved me from stitching too far to bother frogging.
When it’s worth frogging
Some mistakes really do need fixing. Frogging is usually worth it when:
- The mistake throws off the rest of the pattern
- A miscount affects surrounding stitches
- The design is noticeably off-centre
- The wrong colour changes the look of the piece
- You won’t be happy continuing unless it’s corrected. If you’re anything like me, you’ll see that error every time you look at the piece, even after you’ve finished it.
If you find yourself constantly adjusting or second-guessing the rest of the project, frogging early can actually save time and frustration.
When you don’t need to frog
Not every mistake needs to be undone.
You can often leave it alone if:
- The error is small and hard to see
- The colour difference is subtle
- The mistake doesn’t affect nearby stitches
- You’re happy with how it looks overall
- You accept the idea that nothing and no one is perfect. Which is true! It is a handmade thing, so perfection is not required.
Many experienced stitchers leave tiny mistakes in their work on purpose. If you have to point it out for someone to notice, it’s probably fine to keep stitching.
How to frog stitches safely
For a small number of stitches
- Remove your needle from the thread.
- Turn the work over and gently pull the stitches out from the back.
- If needed, use the blunt end of your needle to lift stitches from the front.
Go slowly. Pulling too hard can stretch the fabric or rough up the floss around it.
For larger areas
If you need to remove a lot of stitches:
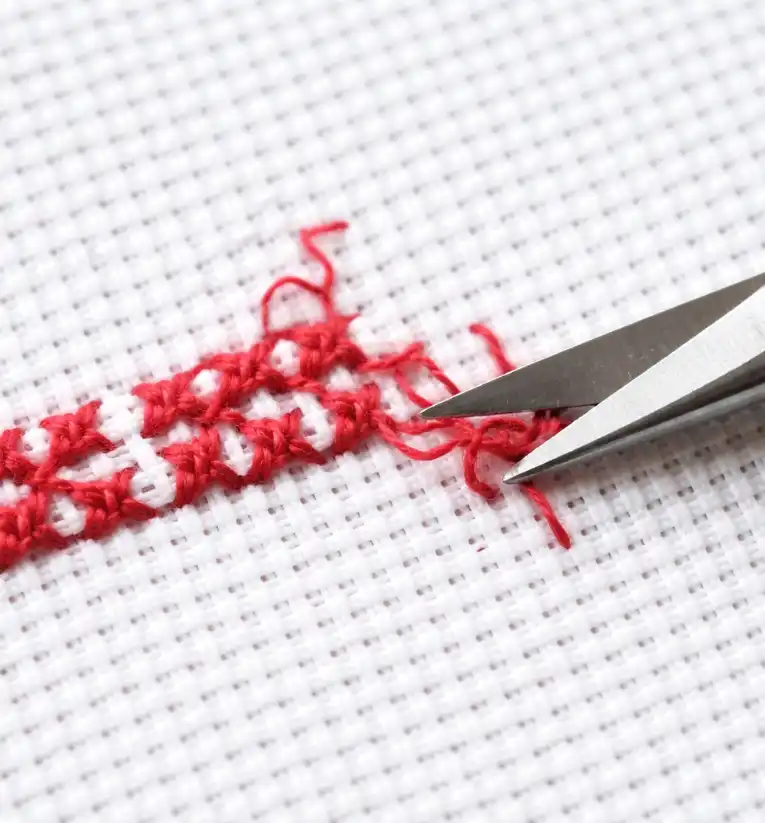
- Use small, sharp embroidery scissors or a seam ripper
- Snip the top leg of the stitch carefully
- Gently pull the remaining thread out from the back
Work in small sections rather than cutting everything at once. This gives you more control and reduces the chance of cutting fabric threads.
What if you accidentally cut the fabric thread while frogging cross stitch?
It happens. Your heart stops, then it races. Stomach knots follow.
Even when you’re being super careful, it’s possible to nick a fabric thread while cutting stitches, especially on tightly woven fabric or when removing a large area. Or working on black. (IYKYK.)
The good news is that a small cut does not mean your project is ruined.
If the cut is small and not spreading
If you’ve only clipped one fabric thread and the hole isn’t growing:
- Stop cutting straight away
- Avoid pulling or stretching the area
- Stitch gently over the spot when you continue
Often, surrounding stitches will stabilise the fabric enough that the cut becomes invisible once the piece is finished and washed.
If the fabric thread has split or opened slightly
If you can see a small gap forming:
- Use a blunt needle to gently nudge nearby fabric threads back into place
- Avoid stitching tightly across the area
- Consider using one fewer strand temporarily to reduce tension
Once stitched and washed, many small gaps close up on their own.
If the cut is noticeable or under tension
For a more obvious cut, especially in a high-tension area:
- Run a single strand of matching sewing thread or floss under nearby stitches on the back
- This acts as a subtle support without creating bulk
- Avoid knots if possible
This is a reinforcement, not a visible repair.
When a patch is worth considering
If the fabric is badly damaged or continuing to split:
- Cut a small piece of similar fabric
- Place it behind the damaged area
- Secure it by stitching through it as you continue stitching the aida – so you stitch through both layers.
This sounds drastic, but it’s rarely visible from the front once the piece is finished.
Using iron-on interfacing for extra support
Some stitchers find it helpful to add a small piece of iron-on interfacing to the back of the fabric if a cut feels unstable or is in a high-stress area.
- Choose a very lightweight interfacing, thinner than the fabric itself. I’ve successfully used woven cotton interface.
- Cut a small patch, just large enough to cover the damaged area and a couple of stitches either side.
- Apply it carefully to the back, following the manufacturer’s heat instructions
This can help stabilise the fabric without adding bulk, especially if the piece will be handled a lot or framed tightly later on.
It’s optional, but it can provide peace of mind if you’re worried the fabric might continue to weaken.
A reality check
Most accidental fabric cuts look far worse in the moment than they do later.
Aida cloth is more forgiving than it seems, and finished stitches, washing, and framing often hide small flaws completely. Many stitchers never find the spot again once the project is done.
One prevention tip
When frogging large areas, cutting only the top leg of stitches and pulling the rest out slowly reduces the risk of catching the fabric underneath.
What to do after frogging
After removing stitches, you might notice:
- Slightly stretched holes
- Fluffy fibres
- Fabric that looks uneven
This is normal.
To tidy things up:
- Gently rub the fabric with a clean finger to help holes close
- Use a needle to coax fabric threads back into place
- If needed, lightly mist or wash the piece once stitching is finished
Most fabric recovers far better than it looks like it will in the moment.
Tips to reduce frogging in future projects
You can’t avoid frogging entirely, but these habits help reduce it:
- Count forward and back before stitching
- Use gridding on your fabric – it can be tedious at the beginning but it’s saved me often!
- Double-check colour symbols before starting an area
- Pause and check placement regularly instead of stitching long runs without stopping
Slowing down slightly often prevents having to undo much more later.
Frogging is part of stitching
Almost every finished cross stitch has been frogged somewhere along the way.
Undoing stitches doesn’t erase progress. It’s just part of the process of getting the result you want. If you’ve ever finished a piece you love, chances are you frogged something to get there.
If you want to understand more of the language stitchers use, including terms like WIP, UFO, ORT, and gridding, you might find our cross-stitch terms glossary helpful.
New to cross stitch? Our cross stitch for beginners guide brings all the basics together in one place.


Leave a Reply