

If you want to display your cross stitch on the wall, you’ve got more options than a standard frame. This page covers classic framing plus easy alternatives like floating frames, wrapped canvas, gallery walls, and hoop finishes.
Want the full list of 20 ways to finish cross stitch? Start at the hub.
This is the “wall display” path in our series on ways to finish cross stitch. It covers classic framing plus several easy alternatives that change the look without turning your project into a whole sewing job.
On this page
If you want wearable ideas, decor, or small gift finishes, start at the hub and jump to the category that fits your piece.
FIRST: It’s Okay to Never Display Your Cross Stitch
There is no rule that says a finished piece must end up on a wall.
Some pieces are stitched because the pattern was fun, the stitching felt calming, or you simply wanted something satisfying to do with your hands.
If you want to press it, fold it, and keep it in a project box, that is a valid finish.
1. Framing: The Familiar Option (but not the only one)
Framing is the most common way to finish cross stitch, so it makes sense to mention it, but it’s only one option.
A frame can:
- protect the stitching
- turn a piece into wall art
- suit traditional or heirloom designs
Framing on a budget
If you want a frame but you don’t want to spend much, start with op shops, Facebook Marketplace, and Buy Nothing groups. You can also reuse frames you already have and refresh them with a quick wipe or a coat of paint. Standard frame sizes are usually much cheaper than custom framing, so it can help to choose your finish size with that in mind.
Quick frame check before you buy
- Check the frame is solid and not warped.
- Check the glass or acrylic is not badly scratched.
- Smell the backing. If it’s musty or looks like it has been stored damp, skip it (or have a plan to replace it).
- Make sure there’s enough depth for fabric and mounting board, not just a thin photo.
If you want the ‘cheap upgrade that looks expensive’, replace the mat and backing. It makes a thrifted frame look fresh straight away.
Floating frame (the sandwich glass look)
A floating frame gives you a clean, modern finish where the fabric looks like it is suspended inside the frame. Your stitched piece sits between two panes of glass, so you can see the edges, and sometimes the back as well.
Best for
- smaller to medium pieces
- modern designs and typography
- pieces where the fabric edge looks neat
Worth knowing
- you’ll want the stitching to sit flat, with no bulky knots or raised beads
- bright light can show any marks or creases on the fabric, so pressing matters

Floating frames can be pricier than standard frames, so they’re often best for smaller pieces or for designs you really want to feature.
You might pick up a floating frame in your favourite thrift shop, or use a clear acrylic photo frame to get a similar look for less.
Wrapped canvas (stretched canvas finish)
Wrapped canvas gives your stitching a crisp, frameless look. Pick up a canvas from a dollar store, wrap your fabric around it making sure there’s no wrinkles, and secure it at the back.
Best for
- bold designs that suit a modern, frameless look
- pieces you want to hang quickly
- anyone who wants a “finished” result without shopping for frames
Worth knowing
- your stitched area needs enough spare fabric around it to wrap neatly
- strong, even tension as you wrap it matters more than perfection
Here’s a full tutorial using a quilted piece as an example.
Gallery-style wall display (one story, many pieces)
A gallery wall is a brilliant option when you have lots of small finishes, or a set that belongs together. It can be a neat grid of matching frames, a mix of sizes, or a themed collection that grows over time.
Best for
- series projects (mini maps, SALs, monthly motifs)
- collections that are still in progress
- small pieces that feel too “tiny” on their own
Worth knowing
- matching frames create a calm, organised look
- mixed frames look more playful, but a simple rule helps, like one colour family or one frame style
- layouts are easier if you arrange on the floor first, then hang
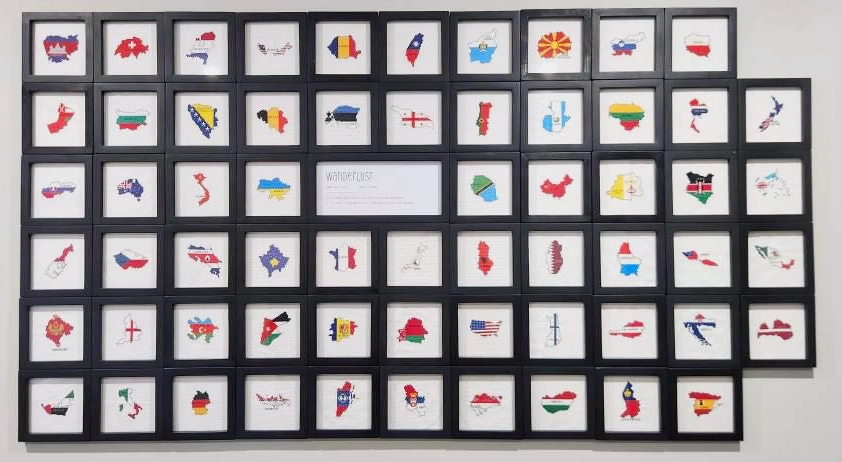
The gallery wall display above is by Emma, one of our travelling cross stitching customers. We’re blown away every time we see it!
Stop Buying Duplicate DMC Floss
This printable mini-book is a pocket-sized DMC inventory you can carry in your project bag. Mark what you own and what you still need, then check it at a glance in the shop, no more scrolling through notes on your phone. Trusted by hundreds of stitchers (and counting!) Instant download, print as many copies as you like.
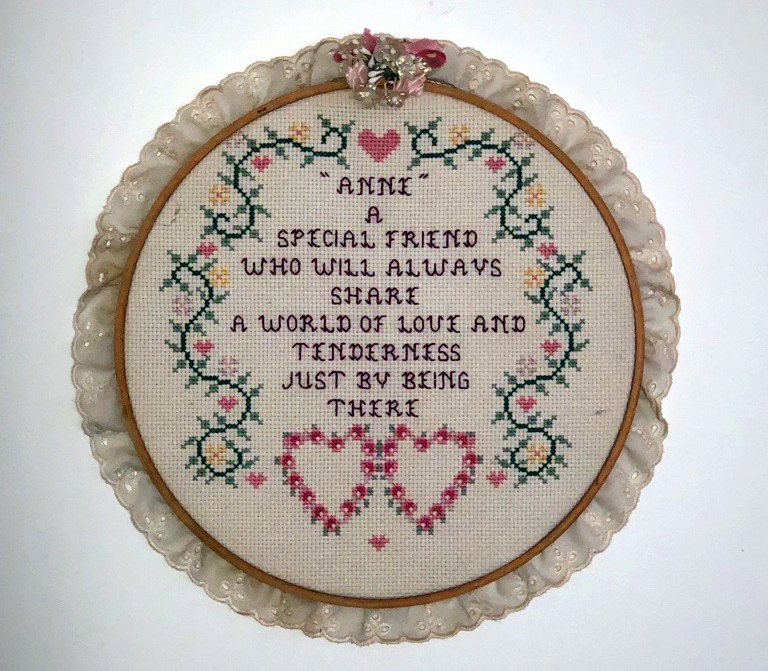
2. Hoop finish (simple, charming, and quick)
Finishing in a hoop is one of the quickest ways to display cross stitch. It suits pieces that feel casual, cheerful, or handmade on purpose, and it works well for small designs.
Best for
- small motifs
- gifts
- seasonal pieces you might swap out
Worth knowing
- a tidy back makes the whole thing look more “finished”
- a hoop can also be hung in a cluster, which looks great on a small wall

Where This Leaves You
If framing has lost its appeal, you now have options.
Whether you want to wear your stitching, use it in your home, turn it into something small and meaningful, or simply enjoy the act of finishing, there’s more than one way forward.
Want more finishing ideas? Take a look at the full set of ideas 20 Ways to Finish Cross Stitch hub.
Or, jump directly to the section that suits your piece. If you want your finished piece to:
- Be seen often, in one spot > Wall display.
- Be seen and handled > Decor.
- Be used regularly > Wearable or functional.
- Be a fast stitch > Small and giftable.
This post is part of our series on finishing cross stitch. Start with the overview, 20 Cross Stitch Finishing Options, or go to another part: wall displays, wearable cross stitch, cross stitch decor and small projects and gifts.



Leave a Reply