
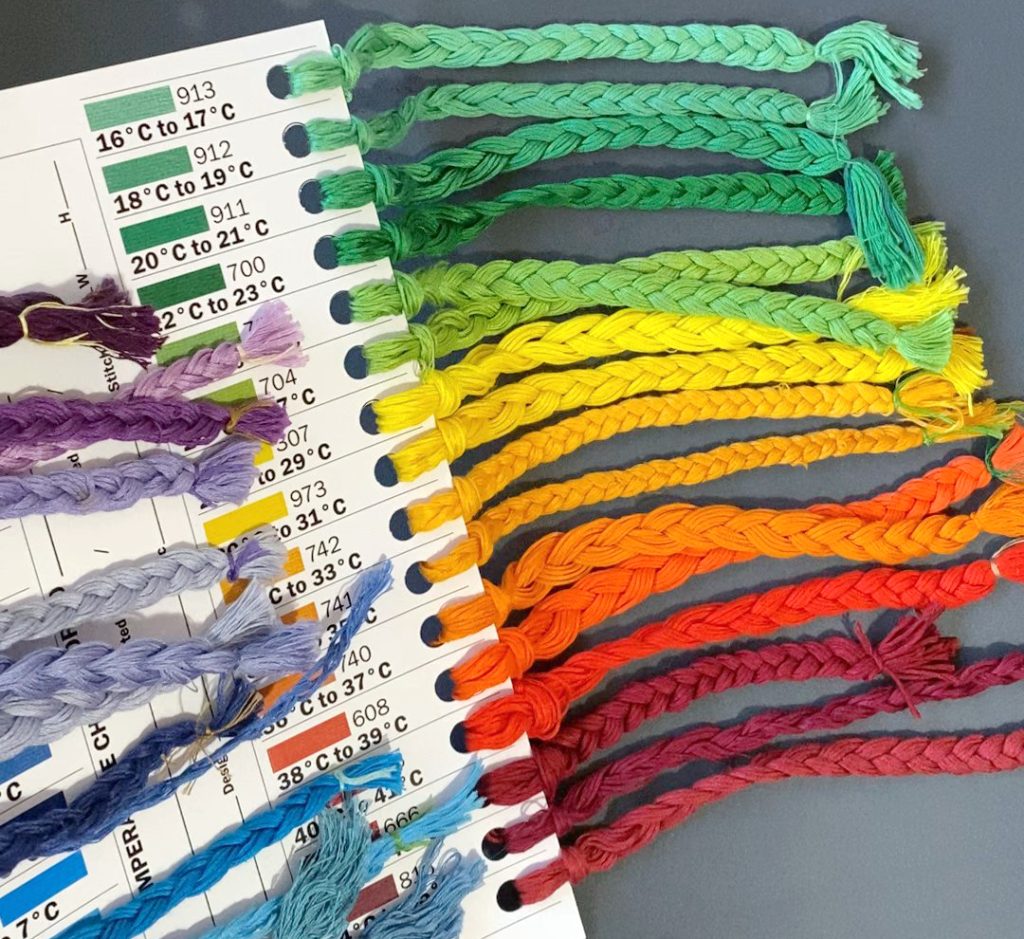
A cross stitch temperature project looks simple on the surface. One tiny design every day, just half an hour stitching. One colour based on the temperature. A full year captured in thread.
Of course you can do it.
But… these projects often stall partway through the year. Not because the stitching is difficult, but because life. So many other demands on your time that chew into your precious stitching minutes.
If you have ever started a cross stitch temperature project with good intentions, then quietly set it aside a few months later, you know exactly what we mean.
This guide walks through how to plan a cross stitch temperature project in a way that makes it easier to keep going, easier to track, and much more likely to be finished.
What’s In This Post
What Is a Cross Stitch Temperature Project?
A cross stitch temperature project is a design stitched gradually over time, usually one row or small design per day. The colour used each day is determined by the temperature.
Some stitchers base their project on:
- The daily high temperature
- The daily low temperature
- The daily average temperature
By the end of the year, the finished piece becomes a visual record of the year’s weather patterns and changing seasons, translated into a vibrant design you’re proud to display in your home.
It is a creative and meaningful project, but it is also a long commitment. That is why planning matters more here than it does for most other cross stitch designs.
Want the planning part done for you? Use our printable Temperature Project Card Pack (°C + °F) to plan your ranges, record your colours, and track the year.
Instant download, print, and use every year.
Why Many Cross Stitch Temperature Projects Do Not Get Finished
Most unfinished temperature projects fail for the same few reasons. Motivation is rarely the issue.
Common challenges stitchers run into
- Colour choices were rushed and don’t feel balanced
- Not all colours were in their stash and they keep meaning to pick up that missing one, but somehow….
- Temperature ranges overlap or leave gaps
- There is no clear system for tracking daily temperatures
- Notes are scattered across notebooks, apps, or scraps of paper
- Falling behind feels discouraging, so the project gets avoided
A cross stitch temperature project does not need more effort. It needs fewer decisions.
Plan First, Stitch Later
Making decisions early helps to make stitching out the design a delightful experience every day (or week/month, depending how often you can commit.)
Planning ahead means:
- You choose your colours once
- You define your temperature ranges once
- You decide how you will track temperatures once
After that, the project becomes routine and enjoyable, rather than mentally heavy.
Step 1: Decide Which Temperature You Will Stitch From
Before choosing colours, decide which temperature you are actually recording. Common options are:
- Daily high
- Daily low
- Daily average
There is no right or wrong choice. What matters is consistency. Pick one method and use it for the entire project.
This decision affects:
- How often colours change
- How much variation appears in the finished piece
- How predictable your daily stitching becomes
Write this decision down somewhere permanent. You do not want to rely on memory months later.
Step 2: Choose Sensible Temperature Ranges
Temperature ranges matter more than individual colours.
Too many narrow ranges can feel overwhelming. Too few wide ranges can make the finished piece look flat.
A balanced approach usually works best
- Narrower ranges around common temperatures
- Wider ranges at extreme highs and lows
- Clear coverage so every possible day fits a range
This avoids the frustration of checking the temperature and not immediately knowing which colour to use.
Step 3: Plan Your Colour Flow, Not Just Your Colours
A cross stitch temperature project is essentially a long colour gradient.
When choosing colours, look at:
- How colours transition from one range to the next
- Whether the gradient feels smooth
- Whether extreme temperatures are visually distinct.
Laying floss out in order from coldest to warmest before committing to a final choice can help you spot awkward jumps early.
Many stitchers prefer starting with a suggested colour progression and adjusting it, rather than building a full palette from scratch.
Want this to be easy? Use our printable Temperature Project Card Pack (°C + °F) to plan your ranges, record your colours, and track the year.
Why a Temperature Project Kit Solves These Problems
One of the most useful ways to make a long project feel manageable is to treat it as its own kit from the beginning.
Your temperature project kit doesn’t need to be elaborate. A small project bag or case is often enough, as long as everything the project needs ‘lives’ together.
When you treat your temperature project as its own long-term setup, it becomes much easier to pick up and put down without friction.
What To Put Into Your Temperature Project Kit
Most stitchers find it helpful to keep these items together:
- Fabric and pattern
- All floss chosen for the full temperature range
- A single reference sheet you fill in every day, showing which colour matches which temperature
- A place to record temperatures every day, as the project progresses.
Keeping everything in one place means you aren’t reassembling the project every time you want to stitch. You open the bag, check the reference, and continue.
Want the planning done for you? Use our printable Temperature Project Card Pack (°C + °F) to plan your ranges, record your colours, and track the year.
Why This Matters Over a Long Project
A dedicated kit quietly solves several common problems.
- It reduces rummaging for colours last used months ago.
- It stops second-guessing decisions already made and approved.
- It gives you more time to actually do your stitching because everything is right where you need it.
- It also helps prevent those dreaded thread orphans.
One Reference Point Makes a Big Difference
Many temperature projects become hard to maintain because information is scattered. When you make your own temperature project kit:
- Colour reference chart is written down in one place.
- Your temperature record is easy to add to and refer to
- Project details are outsourced so you don’t have to try to remember the details.
You can simply check your planner, and enjoy stitching.
That small amount of structure often makes the difference between staying steady and quietly falling behind.
Step 4: Make Tracking Easy, Not Perfect
Daily tracking sounds ideal. Real life does not always cooperate.
A good tracking system allows for:
- Recording temperatures daily or weekly
- Catching up later without stress
- Backfilling missed days using historical weather data
Many stitchers update their records once a week rather than daily. Others enjoy a short daily check-in. Both approaches work if the system supports flexibility.
Tracking should feel quick and easy, not like another task to keep up with.
What to Do If You Fall Behind
Falling behind is almost normal in a year-long cross stitch temperature project. It doesn’t mean the project has failed.
Simple ways to catch up
- Use a weather website to find historical temperatures
- Record several days at once
- Stitch a short catch-up session without worrying about speed
A structured monthly layout makes catching up far easier than scattered notes ever could.
The important thing is that catching up feels possible, not discouraging or overwhelming.
A Finished Cross Stitch Temperature Project Is Built on Small Decisions
The most successful temperature projects are not the most ambitious ones at the start. They are the most organised.
When planning is calm and tracking is simple:
- Stitching stays enjoyable
- Missed days do not derail your progress
- The project stays visible instead of being tucked away
Printable Cross Stitch Temperature Project Cards (recommended kit)
If you like the idea of setting up a temperature project kit but don’t want to design your own reference sheets from scratch, our printable temperature project card set can help you plan and track your cross stitch temperature projects every year.
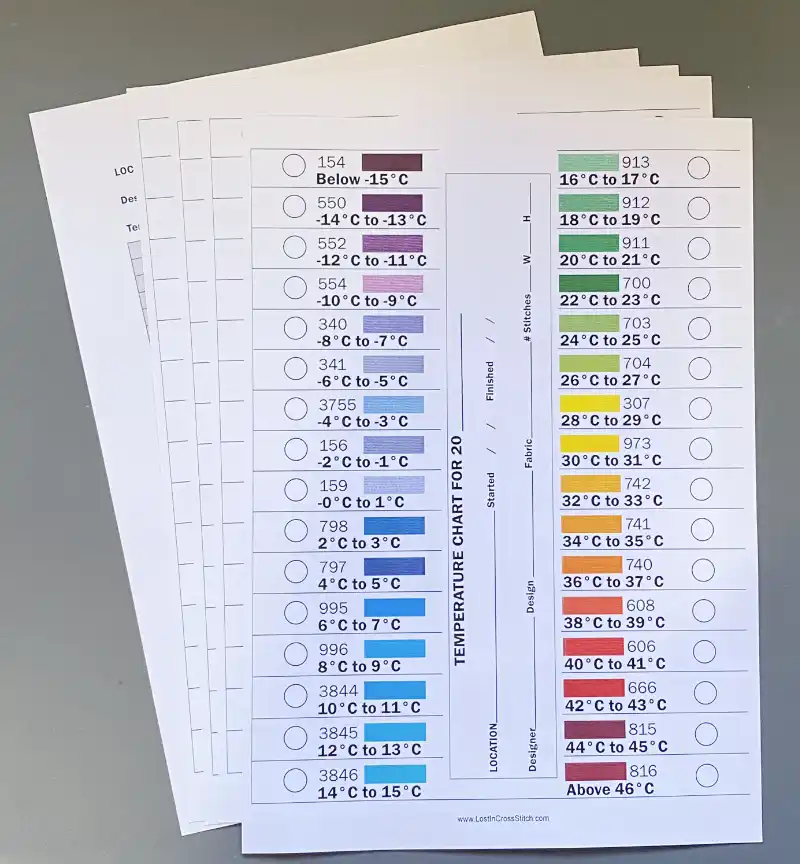
It can to live inside your temperature project bag/case/box. It contains:
- Temperature ranges and chosen DMC colours
- Project details
- A structured way to record temperatures as you go
Because it is printable (and available in Fahrenheit and Celcius), you can use it for multiple projects, reprint if plans change, or keep a fresh copy with each new design.
A little preparation at the beginning can make a year-long project feel far more approachable.


Leave a Reply